To make a cloudy sky effect in resin, build your background first, then place white-tinted resin into wet or slightly thickened blue resin using small, controlled motions. The most believable clouds come from layering: a soft sky base, a brighter white for the cloud body, and light dragging or feathering for edges. Work slowly, keep your resin layer shallow, and avoid overmixing, or the clouds will blur into the background. You can shape fluffy clouds with a stick or silicone tool, or create wispy streaks by dragging white resin in thin lines. Let the piece level, check for hard edges, then cure it dust-free.
What You Need Before You Start
Gather everything before you mix resin, because cloudy sky effects work best when you can move without stopping.
You will need:
- Epoxy resin and hardener suited for art or coating
- A flat resin-safe surface, mold, panel, tray, coaster blank, or canvas board
- Blue pigments or resin dyes in at least two shades, such as sky blue and deeper blue
- White pigment paste, white alcohol-free resin tint, or opaque white mica-resin mix
- Mixing cups and stir sticks
- Small silicone tools, toothpicks, or craft sticks for shaping clouds
- Gloves, apron, and proper ventilation
- A small torch or heat gun for popping surface bubbles
- Isopropyl alcohol and paper towels for cleanup
- A level workspace covered with plastic or silicone mats
- A dust cover, box, or tub to protect the cure
A few conditions matter as much as the supplies. Keep the room warm enough for your resin brand, usually around 70 to 75°F. Cold resin stays thick, traps bubbles, and resists soft blending. Humidity can also affect the finish, so avoid damp spaces if possible.
For the easiest result, choose a project with a relatively flat surface and make a shallow first layer. Deep pours are harder to control when you are trying to preserve cloud shapes. Also, test your white mix on a scrap tile or leftover resin board first. Some whites spread beautifully; others sink, clump, or disappear.
Most important: do not mix more resin than you can use inside the product’s working time.
Step 1
Use this first stage to build the sky base and place the first cloud shapes. Work in order so the white stays visible instead of muddying into the blue.
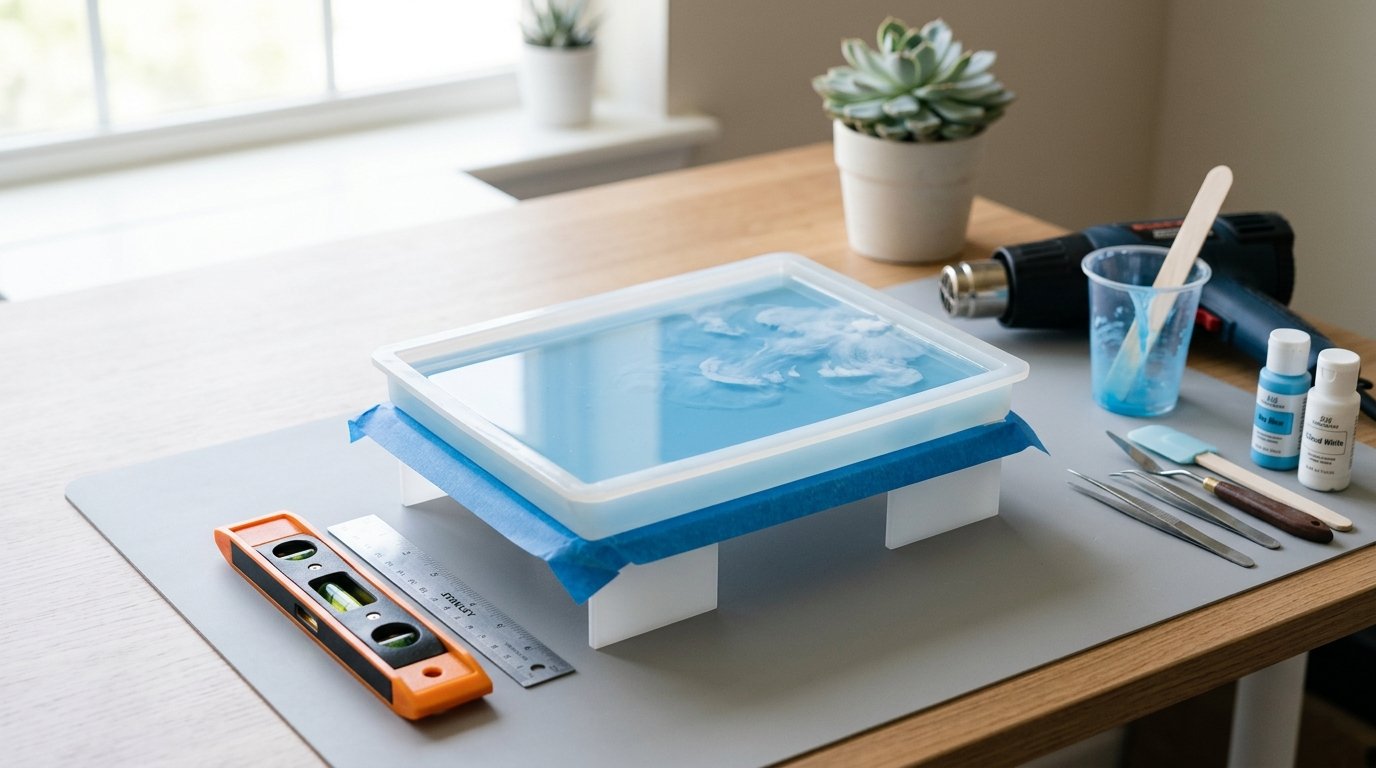
1. Prep and Level the Project
Tape the underside edges if you want a cleaner drip line. Set the piece on risers and check level from more than one side. If the surface is uneven, clouds will slide during cure and lose their natural shape.
2. Mix the Resin Carefully
Measure exactly according to the manufacturer’s ratio. Stir slowly but thoroughly, scraping the sides and bottom of the cup for the full recommended time. Then divide the resin into small cups: one for pale blue, one for medium or deeper blue, and one for white.
Caution: under-mixed resin can leave soft spots, and cloudy details will look fine at first but fail during cure.
3. Create the Sky Background
Tint one cup light sky blue and another slightly deeper blue. Pour the lighter shade across most of the surface, then add a little deeper blue at the top edge or corners. Use a spreader, gloved hand, or silicone brush to blend gently. Aim for a gradient, not harsh stripes.
A believable sky usually looks lighter near the horizon area and slightly richer overhead. If your project is small, keep the gradient subtle. Too much contrast can make the clouds look pasted on.
Check the layer thickness. A thin to medium coat is easiest for cloud work. If the layer is too deep, white pigment can sink or spread too far.
4. Let the Base Settle, Then Remove Bubbles
Wait a minute or two so the resin self-levels. Pass a torch or heat gun quickly over the surface to pop bubbles. Keep the tool moving and stay several inches away.
Caution: too much heat can thin the resin fast and cause your cloud shapes to bloom uncontrollably.
5. Place the First Cloud Bodies
Tint the white resin until it is clearly opaque. Pick up a small amount with a stick or silicone tool and drop it onto the blue in loose clusters. Think in broken shapes, not perfect circles. Real clouds usually have fuller tops and softer, flatter bottoms.
Start with less white than you think you need. You can always add more, but heavy blobs are harder to soften naturally.
Step 2
Now shape, layer, and preserve the cloud effect. This stage is where the sky turns from “white spots in blue resin” into actual clouds.
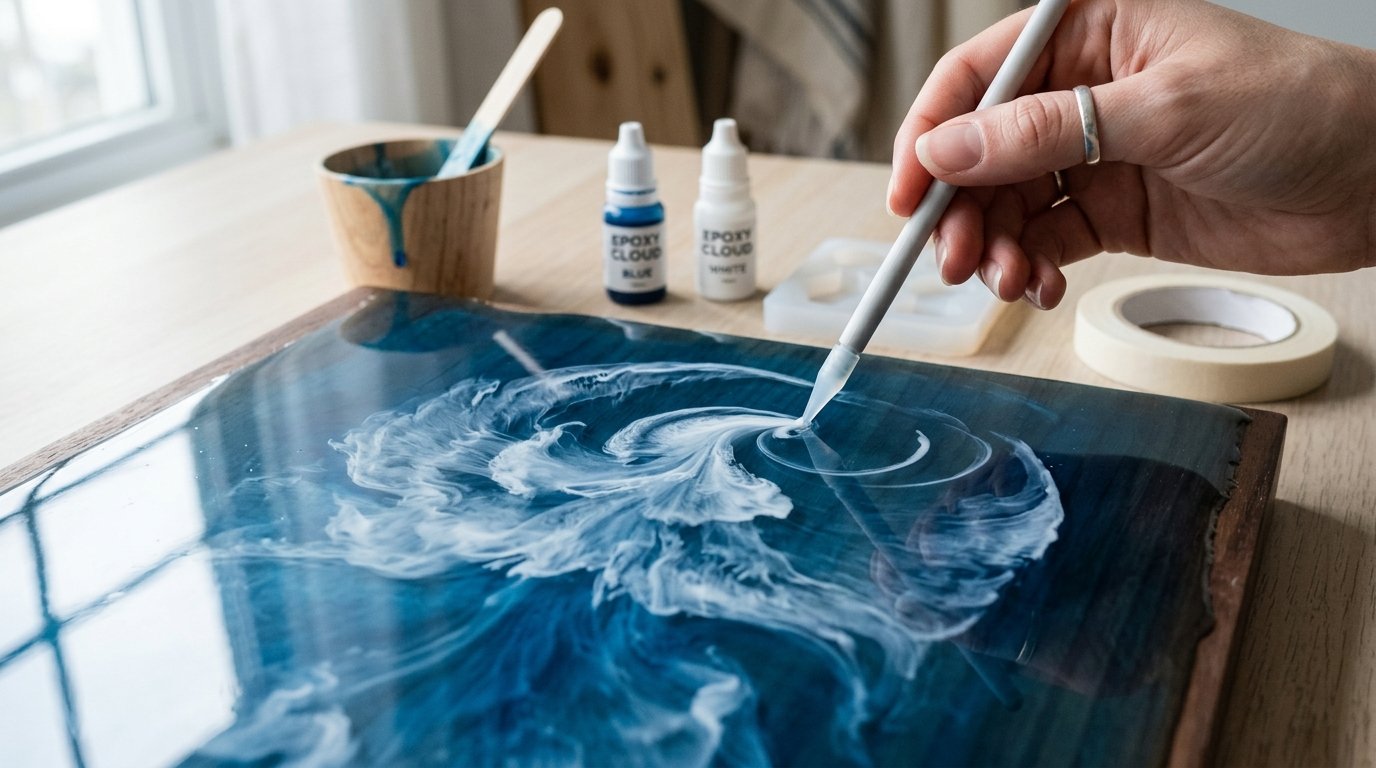
6. Shape the Clouds with Light Dragging Motions
Use a toothpick, needle tool, or fine silicone tip to pull the edges of the white outward in tiny arcs. Drag from the white into the blue, not from blue into the white. That keeps the cloud body bright while feathering the edge.
For fluffy clouds, round the top edges and leave some denser white in the middle. For stretched or windy clouds, pull the white sideways in thin streaks. Work with small motions and stop often to look from a distance.
Caution: overworking is the fastest way to ruin the effect. If you keep stirring, the cloud turns into pale blue haze.
7. Add Depth with a Second Pass
Once the first shapes settle for a minute, place tiny dots or short ribbons of fresh white on top of the thickest areas. This creates brighter highlights and gives the cloud a layered look. If you want a soft gray shadow, mix a trace of blue into a little white and place it under part of a cloud body very sparingly.
Keep the highlights irregular. A few bright centers look better than coating every cloud with solid white. You want variation: some denser puffs, some semi-transparent edges, and some open blue space between them.
Quality check: if every cloud is the same size and spacing, the result will look patterned instead of natural. Break up the arrangement.
8. Finish the Surface and Leave It Alone to Cure
Pop any new bubbles with one very quick pass of heat. Then stop touching the piece. Resin continues to flow during the early cure stage, and too much correction usually creates muddy edges.
Cover the project with a dust shield and let it cure on a level surface for the full recommended time. Do not carry it around to “check from different rooms,” because even slight tilting can shift the clouds.
If you want a stronger layered-sky effect, you can add another clear or lightly tinted top coat after the first layer cures. That works especially well for trays, wall art, and jewelry pieces where you want more visual depth without disturbing the original clouds.
How to Check the Result
A successful cloudy sky effect should look soft, layered, and intentional rather than swirled together. Stand back and check these points:
- The clouds are still visible. You should see distinct white forms, not faint milky patches lost in blue.
- The edges look natural. Good resin clouds usually have some soft feathering, but not total blur.
- There is value contrast. The sky should have at least slight blue variation, and the clouds should include brighter and softer white areas.
- The composition feels uneven in a good way. Real skies are irregular. Some clouds can be clustered while others stay small or wispy.
- The surface cured evenly. No gummy spots, craters, or unexpected sinking around the white areas.
If your clouds vanished, your white was too transparent or you overblended. If they spread into cauliflower blooms, the layer was too thin, too hot, or pushed too aggressively with heat. If the clouds look chunky, the white may have been too thick or dropped in too heavily. In most cases, you can fix the look with a cured second layer: pour a fresh blue-tinted coat and rebuild cleaner, smaller cloud shapes on top.
FAQ
What Kind of White Works Best for Resin Clouds?
An opaque white pigment paste usually works best because it stays visible and holds shape better than thin dye. A resin-safe liquid white can also work if it is strongly pigmented. Avoid weak, transparent whites unless you want extremely soft, barely-there clouds.
Can I Make Clouds in Epoxy Resin Without a Heat Gun?
Yes. You can use a toothpick, silicone tool, or craft stick to place and feather the white resin. A torch or heat gun mainly helps remove bubbles. If you skip heat, mix slowly, let bubbles rise, and keep your cloud shaping gentle.
Why Did My Clouds Disappear Into the Resin?
Usually the white was too transparent, the blue layer was too deep, or you blended too much. Excess heat can also cause the white to spread and fade. Use a more opaque white, smaller amounts, and shorter dragging motions next time.
How Do I Make Wispy Clouds Instead of Fluffy Clouds?
Start with very little white resin and place it in short, thin lines rather than blobs. Drag the white sideways with a fine tool using light, quick strokes. Leave open blue gaps and avoid adding bright central highlights that create puffier shapes.
Can I Add a Second Cloud Layer After the First Cures?
Yes, and it often improves depth. Let the first layer cure fully, then pour a fresh clear or lightly blue-tinted coat. Add smaller, selective clouds on top so the layers stay distinct. Just make sure the cured surface is clean before recoating.