
An epoxy resin coffee table can be a simple coated wood table, a dramatic river table, or a custom tabletop filled with color, stones, shells, photos, or other sealed objects. The key is planning the style first, then controlling the resin conditions: accurate measuring, clean mixing, correct pour depth, leak-proof forms, and enough curing time. This epoxy resin coffee table tutorial walks you through the process from tabletop preparation to final result checks so you can make a sturdy, attractive table without the most common beginner mistakes.
Before You Start: Choose the Coffee Table Style
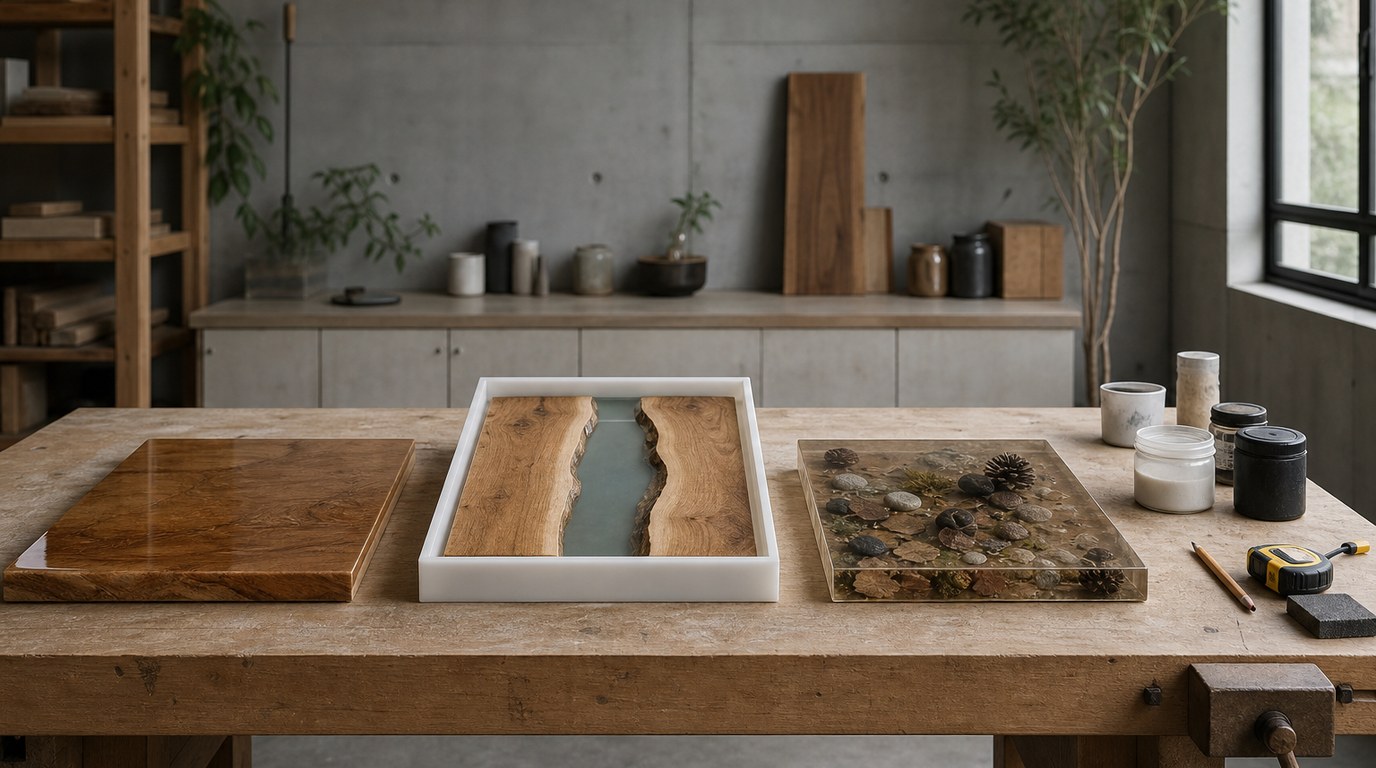
Decide what kind of table you are making before buying resin. A coated tabletop uses a thin epoxy layer over wood, paint, or laminate. It is the easiest beginner option. A river table uses two wood slabs with resin poured between them, usually inside a mold. An embedded-object table has items set under or inside the resin. A full resin-pour tabletop uses mostly resin and needs stronger mold planning.
Your choice affects resin type, pour depth, mold strength, cure time, sanding work, and cost. For a first project, start with a small coated tabletop or shallow river-style pour.
Prerequisites: Workspace, Safety, and Resin Conditions
Set up your workspace before opening the resin. Work in a well-ventilated area, but avoid strong drafts that blow dust onto the surface. Wear nitrile gloves, eye protection, long sleeves, and a respirator suitable for resin fumes if your product instructions recommend it.
Check the resin label for working temperature, mix ratio, maximum pour depth, cure time, and recoating window. Most epoxy performs best in a stable, moderate room temperature. Cold resin can mix poorly and trap bubbles; overheated resin can cure too fast.
Cover floors and nearby surfaces. Level your workbench in both directions. Keep a torch or heat gun, mixing cups, stir sticks, tape, plastic sheeting, and cleanup supplies within reach.
Step 1: Build or Prepare the Tabletop Base
For a coated table, clean the tabletop, remove grease, and sand the surface so epoxy can grip. Wipe away dust with a lint-free cloth. Do not use oily cleaners right before pouring.
For a river table or full pour, build a mold from melamine board, HDPE, or another non-stick mold surface. Seal all seams with silicone caulk and reinforce the sides so resin pressure cannot bow them outward. Apply mold release if needed.
Dry-fit the wood slabs, legs, and design layout. Clamp or weigh down floating wood pieces before pouring, because resin can lift them.
Step 2: Seal the Wood Before the Main Pour
Wood releases air into resin, causing bubbles that can keep appearing for hours. A seal coat helps prevent that. Mix a small batch of epoxy according to the manufacturer’s ratio, then brush a thin layer over all exposed wood surfaces that will touch the main pour.
Pay special attention to live edges, knots, cracks, end grain, and porous areas. These spots release the most air. Let the seal coat become tacky or cure as directed by your epoxy instructions before continuing.
If the seal coat cures fully, lightly sand it before the main pour unless the product allows recoating without sanding.
Step 3: Measure and Mix the Epoxy Resin Correctly
Read the label and follow the exact mix ratio by volume or weight. Do not guess. Using “a little extra hardener” will not make epoxy cure faster; it can cause sticky, soft, or cloudy spots.
Measure resin and hardener into a clean cup. Scrape the sides and bottom while mixing slowly for the time recommended by the manufacturer. Fast whipping adds bubbles. For best results, use the two-cup method: mix in one cup, pour into a second clean cup, then mix again.
Only mix the amount you can pour within the working time. Large batches can heat up quickly.
Step 4: Add Color, Effects, or Inclusions
Add pigments after the resin and hardener are fully mixed. Use resin-safe colorants such as mica powder, alcohol ink approved for resin, or epoxy pigment paste. Add small amounts first; too much colorant can affect curing.
For swirls, divide resin into separate cups, tint each cup, and pour in layers or ribbons. For embedded objects, make sure they are dry, clean, and sealed if porous. Paper, flowers, shells, and fabric can trap air or darken unless sealed first.
Avoid adding water-based materials unless the product specifically supports them.
Step 5: Pour the Resin in the Right Depth
Check your epoxy’s maximum pour depth. Some coating resins are meant for thin layers only, while deep-pour resins can handle thicker pours. Pouring too deep can cause overheating, cracking, yellowing, smoke, or a warped surface.
Before pouring, check the mold again for gaps. You can do a small leak test with water before the resin stage, but the mold must be completely dry before use.
Pour slowly into the lowest area first and let resin flow outward. For river tables, pour in stages if the depth exceeds the product limit. Use a spreader for thin coated tabletops, guiding resin over the edges only if you want a flood-coat finish.
Step 6: Remove Bubbles and Protect the Cure
After pouring, wait a few minutes for bubbles to rise. Pass a torch or heat gun quickly over the surface to pop bubbles. Keep it moving; holding heat in one area can scorch resin, create waves, or damage pigments.
Use a toothpick or small stick to pull bubbles out of corners, cracks, or around embedded objects. Recheck the surface during the early working time, because more bubbles may rise.
Cover the table with a clean dust cover, box, or tented plastic that does not touch the resin. Keep pets, insects, lint, and sawdust away while it cures.
Step 7: Demold, Trim, Sand, and Level the Tabletop
Wait until the resin is firm enough to handle before demolding. This may be longer than the initial cure time, especially for thick pours. If the resin still dents easily with a fingernail, give it more time.
Remove the mold sides carefully. Trim overflow or sharp edges with a router, saw, chisel, or scraper depending on the table shape. Wear a dust mask or respirator when sanding cured epoxy and wood.
Sand through grits gradually. For leveling, start with a lower grit only if needed, then move upward. Keep the sander flat to avoid dips. Clean dust between grits so scratches do not carry forward.
Step 8: Polish, Topcoat, and Attach the Legs
For a glossy resin surface, continue sanding to very fine grits and polish with a suitable compound. For a softer sheen, stop at the grit that gives the look you want and apply a compatible topcoat.
If the table will be used daily, consider a protective finish such as polyurethane, varnish, or a resin-compatible clear coat. Follow compatibility and cure instructions carefully; not every finish bonds well to every epoxy.
Attach legs only after the tabletop is hard, flat, and fully supported. Pre-drill screw holes where needed, avoid drilling too close to resin edges, and use hardware strong enough for the table’s weight.
Result Check: How to Know Your Epoxy Coffee Table Is Ready
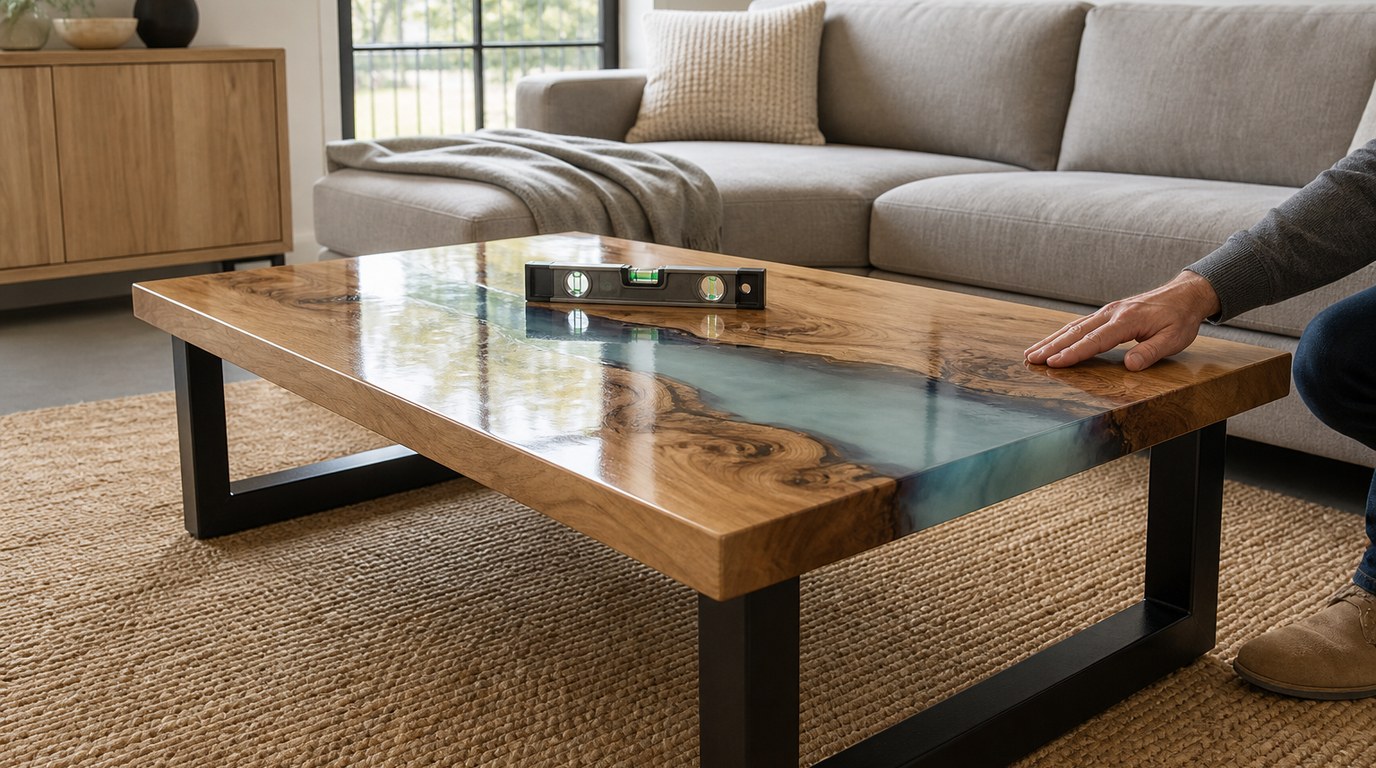
Your table is ready to use when the resin is hard, clear or evenly colored, and no longer tacky. The surface should not dent under light fingernail pressure. The tabletop should sit flat without wobbling, and the legs should be firmly attached.
Check for sharp edges, exposed splinters, soft spots, trapped dust, or loose inclusions. If you applied a topcoat, wait for its full cure time, not just its dry-to-touch time. Use coasters and avoid hot pans or heavy impacts unless your finish is rated for them.
Common Mistakes and Troubleshooting
Sticky or soft resin: The mix ratio may have been wrong, the batch may not have been mixed long enough, or the room may have been too cold. Scrape off uncured resin and recoat only after the surface is clean and stable.
Too many bubbles: Seal porous wood, warm resin slightly if allowed, mix slowly, and use heat carefully after pouring.
Leaks: Stop small leaks with tape, hot glue, or fast-setting sealant from the outside if possible. For future pours, reinforce and seal the mold better.
Cloudy finish: Moisture, incompatible colorants, or poor mixing may be the cause.
Uneven surface: Level the table before pouring. After curing, sand flat and apply a thin finish coat if needed.
FAQ
What Is the First Step Someone Should Take with Epoxy Resin Coffee Table Tutorial?
The first step is choosing the table style: coated tabletop, river table, embedded-object table, or full resin-pour tabletop. That decision controls the mold, resin type, pour depth, curing time, and finishing process. Beginners should usually start with a small coated or shallow-pour design.
What Can Go Wrong When Following Epoxy Resin Coffee Table Tutorial Advice?
Common problems include sticky resin from poor measuring, bubbles from unsealed wood, leaks from weak molds, overheating from pours that are too deep, and dust settling during cure. Most issues come from rushing preparation, ignoring the resin instructions, or working in unstable temperature conditions.
How Long Does It Usually Take to Work Through Epoxy Resin Coffee Table Tutorial?
Hands-on work may take one to three days, but total project time is usually several days to over a week. Seal coats, staged pours, curing, sanding, polishing, and topcoats all add time. Thick pours often need longer before the table is safe to handle or assemble.
How Can a Beginner Tell Whether Epoxy Resin Coffee Table Tutorial Worked?
The project worked if the resin cured hard, the surface is even, the table is stable, and there are no sticky spots, sharp edges, loose objects, or major bubbles. The finished table should feel solid, sit level, and be fully cured before everyday use.