A DIY live edge resin table combines natural wood slabs with epoxy resin to create a durable tabletop with a river, gap-fill, or clear-cast effect. The basic process is simple: choose dry wood, seal and secure it in a mold, mix resin accurately, pour in safe layers, then flatten, sand, finish, and attach a base. The details matter. Wet wood, weak molds, wrong resin ratios, deep pours, and rushed curing can ruin an otherwise good build. This guide walks through each stage in order so you can plan the project, avoid common failures, and check that your finished table is ready for everyday use.
Before You Start: Project Difficulty, Time, and Workspace
A live edge resin table is an intermediate DIY project. Beginners can do it, but it requires patience, accurate measuring, and a controlled workspace. Plan for several days to a few weeks, depending on slab preparation, resin cure time, and finishing.
Work in a dust-controlled, well-ventilated area within the resin manufacturer’s recommended temperature range. You need a level surface, protective gloves, eye protection, mixing containers, a mold, clamps or weights, sanding tools, and enough epoxy for the full pour.
Step 1: Choose and Prepare the Live Edge Wood
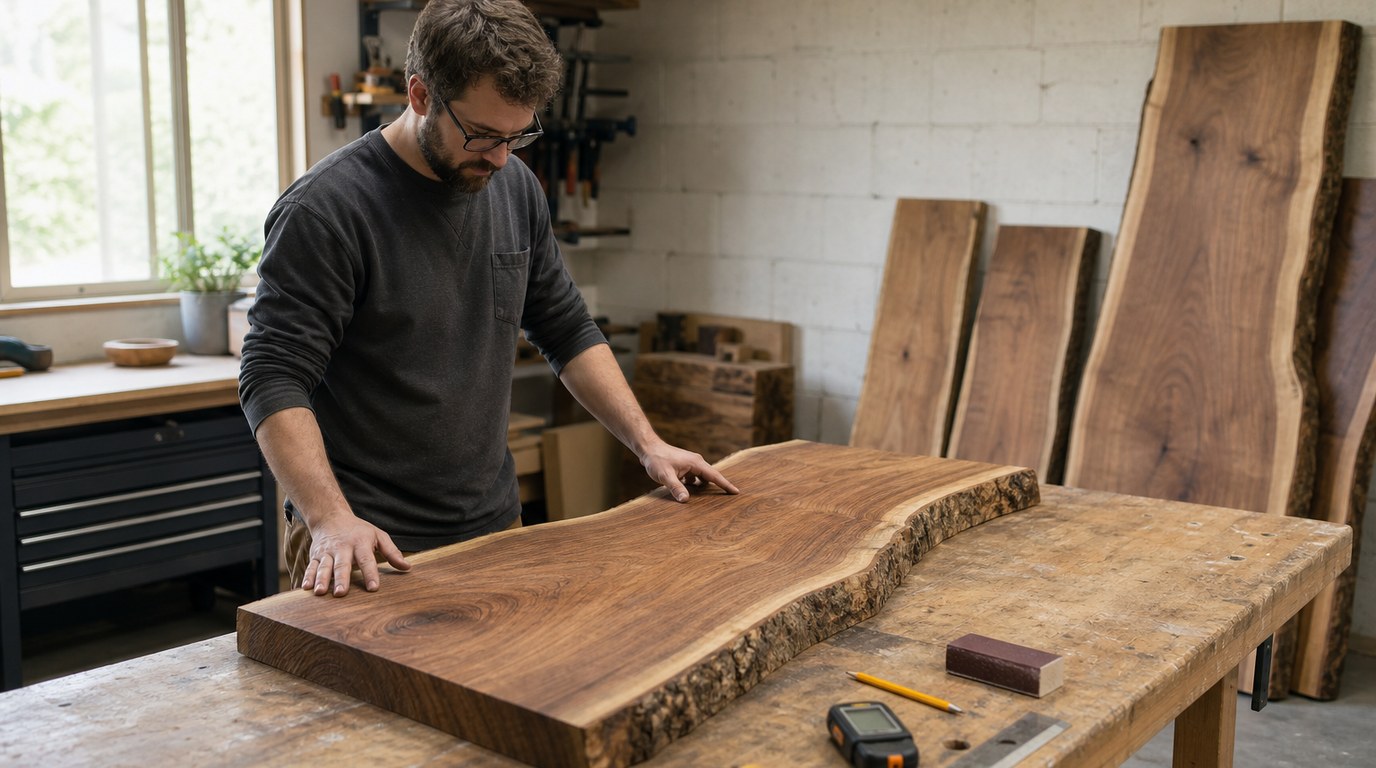
Choose kiln-dried or properly air-dried hardwood slabs with a moisture content generally around 6% to 10%. If the wood is too wet, resin may cloud, bubble, separate, or cure poorly. Avoid slabs with active rot, loose bark, oily contamination, or deep hidden cracks unless you are prepared to stabilize them.
Remove bark from the live edge if it is loose. Resin bonds better to clean, solid wood than to crumbly bark. Brush, vacuum, and wipe away dust. Fill or seal small cracks, knots, and porous end grain with a thin coat of epoxy before the main pour. This reduces bubbles later.
Dry-fit the slabs in your desired layout before building the mold.
Step 2: Build a Leak-proof Resin Mold
Build the mold from melamine board, sealed plywood, acrylic, or another smooth material that resin will not permanently bond to when protected. Make the mold slightly larger than the finished tabletop so you have room to trim the edges clean.
Seal all seams with silicone caulk. Press the caulk firmly into corners and smooth it so there are no pinholes. Apply mold release, packing tape, or sheathing tape to surfaces that will touch resin. Resin finds tiny gaps, so do not rely on “tight enough” joints.
Place the mold on a level workbench or floor. Before adding wood or resin, test the mold with a small amount of water if the materials allow it, then dry it completely.
Step 3: Secure the Slabs so They Do Not Float
Wood can float when resin is poured around it. Secure the slabs before mixing epoxy. Use crossbars screwed to the mold sides, clamps, blocks, or weighted cauls to hold the wood down without damaging the top face.
Check that the live edges are positioned exactly where you want them. Leave enough gap for the resin feature, but avoid very narrow channels that are hard to pour and sand. Recheck level after clamping.
Step 4: Measure, Tint, and Mix the Resin
Use the correct epoxy type for your pour depth. Deep-pour resin is designed for thicker casts; tabletop coating resin is usually meant for thin layers. Read the manufacturer’s limits for maximum depth, working time, temperature, and cure schedule.
Measure resin and hardener by the specified ratio, either by volume or weight. Do not guess. Inaccurate ratios can leave soft, sticky, or brittle areas.
Add pigment sparingly. Metallic powders, transparent dyes, and opaque pigments all behave differently, so test a small batch if appearance matters. Mix slowly and thoroughly, scraping the sides and bottom of the container. Transfer to a second clean container and mix again for better consistency.
Step 5: Pour the Resin in Controlled Layers
Pour slowly into the lowest areas first, letting resin flow around the live edge. If your project requires more depth than one safe pour, pour in layers according to the resin instructions. Pouring too deep can cause overheating, cracking, yellowing, or excessive bubbles.
Use a heat gun or torch lightly to pop surface bubbles, but keep it moving. Too much heat can scorch resin, damage pigments, or create waves. For bubbles rising from the wood, pause and allow them to escape before adding more resin.
Cover the mold with a dust shield between pours. If the previous layer has fully cured beyond the recoat window, scuff it lightly before pouring the next layer so the bond is strong.
Step 6: Let the Resin Cure Completely
Do not demold early. Resin may feel firm on top while remaining soft underneath. Follow the full cure time listed by the manufacturer, and allow extra time if the workspace is cool.
Keep the table level and protected from dust, insects, and temperature swings during curing. Avoid moving the mold while the resin is still reactive. Shifting the slab can create uneven resin thickness or disturb pigment patterns.
Step 7: Demold, Flatten, and Trim the Tabletop
Once fully cured, remove clamps, mold walls, and the base carefully. If the mold was sealed and released correctly, the tabletop should separate with steady pressure rather than forceful prying.
Flatten the slab with a router sled, CNC, wide belt sander, or professional surfacing service. This step is essential because resin and wood often cure or move at slightly different heights. Trim the ends and sides to final dimensions using a track saw, circular saw with guide, or table saw if the size is manageable.
Check for voids or chips after trimming and patch them before sanding.
Step 8: Sand and Finish the Live Edge Resin Table
Sand progressively. A common sequence is 80, 120, 180, 220, and higher if your chosen finish requires it. Do not skip too many grits, or scratches may remain visible in the resin. Keep the sander flat and avoid lingering in one spot, especially on resin, which can heat and smear.
For a glossy resin surface, continue wet sanding into higher grits and polish with compound. For a natural furniture finish, many builders sand to 220 or 320 and apply oil, hardwax oil, polyurethane, or a compatible topcoat.
Verify that the wood and resin have an even sheen before finishing. Dust off thoroughly, and test finish on an offcut or hidden area if possible.
Step 9: Attach Legs or a Base
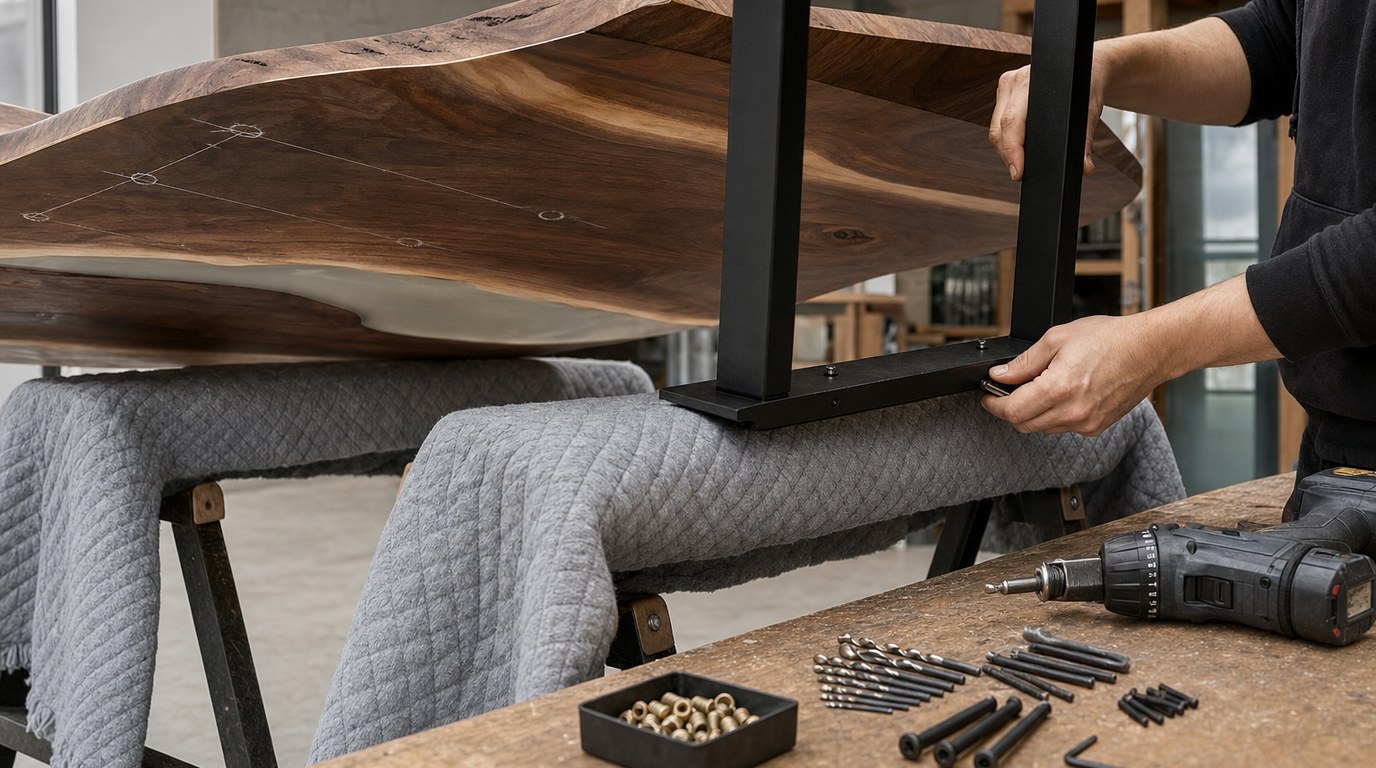
Choose legs or a base strong enough for the tabletop weight. Resin tables can be heavier than standard wood tables, especially with thick pours.
Mark mounting holes carefully. Pre-drill into the wood areas when possible, not just resin. Use threaded inserts for a stronger removable connection, and avoid screws that are too long. If the tabletop is large, consider slotted mounting holes or figure-eight fasteners to allow seasonal wood movement.
Set the table upright with help, then check for wobble.
Common Mistakes and Troubleshooting
Resin leaks from the mold: Stop and seal the leak with fast-setting hot glue, silicone, or tape if accessible. For future pours, overbuild the mold and seal every seam before pouring.
Wood floats or shifts: This happens when slabs are not clamped securely. Secure wood from above and from the sides before pouring.
Soft or sticky resin: The most common causes are wrong mix ratio, incomplete mixing, low temperature, or incompatible pigment. Scrape away uncured resin if needed and repair only after identifying the cause.
Excessive bubbles: Seal porous wood before the main pour, mix slowly, and use controlled heat. Bubbles from live edges often mean air is escaping from unsealed grain.
Cracks or overheating: The pour was likely too deep or the resin cured too hot. Use deep-pour epoxy and follow depth limits.
Cloudy finish or scratches: Continue sanding through proper grits, then polish or apply a suitable topcoat.
Final Result Check: Is Your Diy Live Edge Resin Table Ready to Use?
Before using the table, confirm that the resin is fully hard, not tacky, and has no soft spots. The tabletop should sit flat without rocking. Edges should be smooth to the touch, and the finish should be fully cured according to the product label.
Check that the legs or base are tight, balanced, and rated for the weight. Place the table in its final location and recheck stability before loading it with décor, dishes, or equipment.
FAQ
What Is the First Step Someone Should Take with Diy Live Edge Resin Table?
Start by choosing dry, stable live edge wood. Check moisture content, remove loose bark, clean the surface, and plan the slab layout. Good wood preparation prevents many later problems, including bubbles, weak bonding, warping, and cloudy resin.
What Can Go Wrong When Following Diy Live Edge Resin Table Advice?
The most common problems are leaking molds, floating slabs, sticky resin from wrong ratios, bubbles from unsealed wood, and cracks from pouring too deep. Most failures come from rushing preparation or ignoring the resin manufacturer’s limits.
How Long Does It Usually Take to Work Through Diy Live Edge Resin Table?
Hands-on work may take one to three days, but total project time is often one to three weeks. Dry fitting, sealing, pouring multiple layers, curing, flattening, sanding, finishing, and base installation all add time, especially for large tables.
How Can a Beginner Tell Whether Diy Live Edge Resin Table Worked?
The table worked if the resin cured hard and clear or evenly tinted, the wood is firmly bonded, the surface is flat, and the base is stable. There should be no sticky areas, major bubbles, sharp edges, or wobble before regular use.