
A colored dirty pour is made by tinting separate cups of mixed epoxy, layering those colors into one larger cup, then pouring them together so the colors flow, marble, and overlap naturally. The key is control: choose a simple palette, mix the epoxy accurately, avoid adding too much pigment, and pour slowly enough that the colors move without becoming muddy. This tutorial walks you through the full process from setup to curing, with beginner-friendly checks for bubbles, soft spots, color separation, and overworked designs.
Before You Start: What a Colored Dirty Pour Should Look Like
A good colored dirty pour should look fluid, layered, and intentional. You may see ribbons, cells, waves, marbling, or soft blended edges depending on your resin, pigments, and pouring motion. The colors should remain visible instead of turning into one dull shade.
Do not expect perfect control. Dirty pours are partly planned and partly organic. Your goal is not identical stripes or sharp lines; it is a balanced flow where the colors interact without disappearing into each other.
Prerequisites: Safety, Workspace, and Resin Readiness
Before opening resin, prepare your workspace. Work in a well-ventilated area and wear nitrile gloves. If your resin requires a respirator or extra ventilation, follow the manufacturer’s safety instructions. Protect your table with plastic sheeting, silicone mats, or disposable paper.
Your surface or mold should be clean, dry, level, and dust-free. Resin will flow toward the lowest point, so check the level before mixing. Have all cups, stir sticks, pigments, a timer, paper towels, and a torch or heat gun ready.
Use epoxy resin designed for your project type. Deep-pour resin, coating resin, and casting resin behave differently. Check the working time, mixing ratio, maximum pour depth, and cure time before you start.
Step 1: Plan Your Color Palette
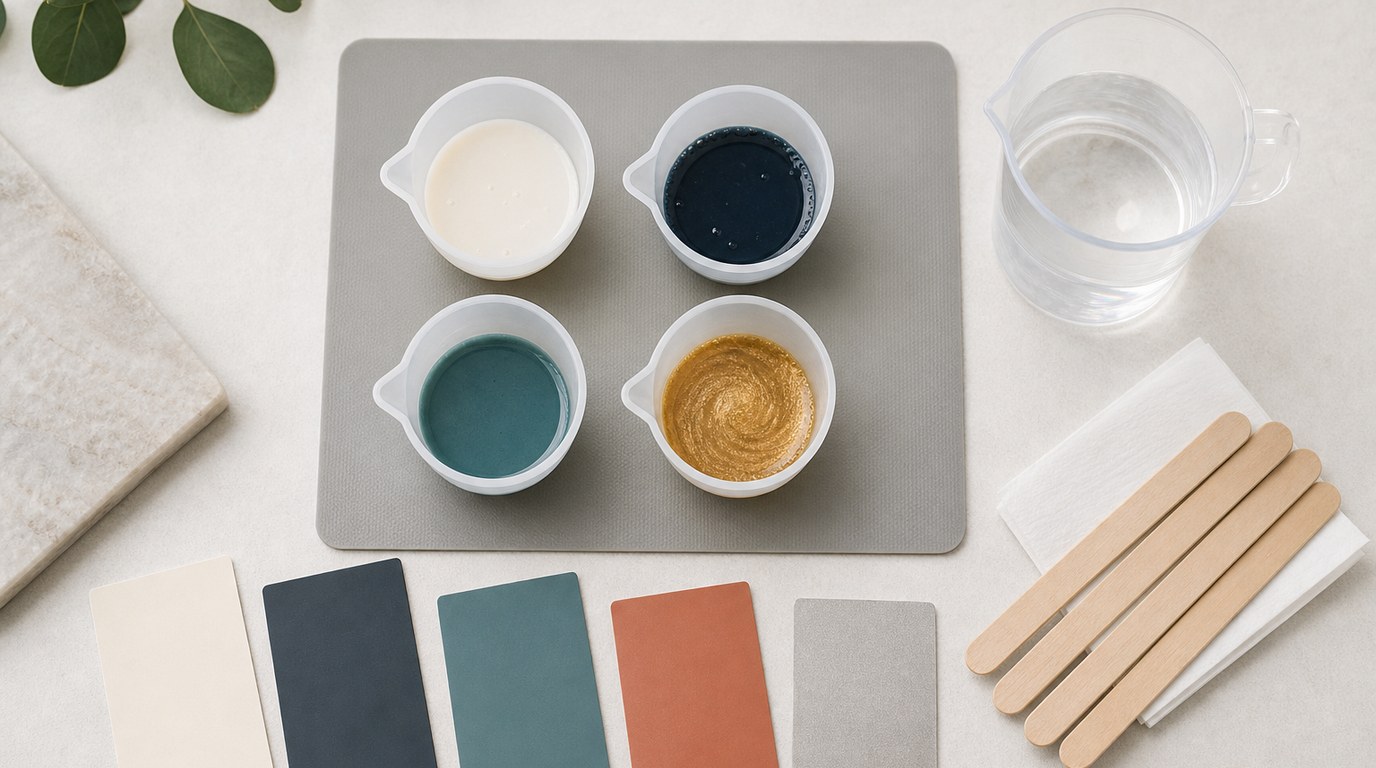
Choose three to five colors for your first dirty pour. Too many colors make mud more likely. A beginner-friendly palette includes one light color, one dark color, one medium color, and one metallic or white accent.
Avoid layering strong opposites too heavily, such as red and green or purple and yellow, unless you want brown or gray blending. If you want contrast, separate those colors with white, clear resin, gold, silver, or another buffer shade.
Decide which color should dominate. Mix more of that color and use smaller amounts of bold accent colors.
Step 2: Measure and Mix the Epoxy
Read the resin instructions carefully. Some epoxies mix 1:1 by volume, while others use 2:1 or a weight-based ratio. Guessing is one of the fastest ways to get sticky or soft resin.
Measure Part A and Part B into a clean mixing cup according to the required ratio. Scrape the sides of the bottles or containers cleanly so your measurement stays accurate. Mix slowly for the full recommended time, usually three to five minutes, unless your resin says otherwise.
Scrape the sides and bottom of the cup while mixing. Do not whip the resin like cake batter; fast stirring traps bubbles. When the resin looks uniform with no streaky swirls, it is ready to divide. If your resin requires a second-cup mix, pour it into a new cup and stir again.
Step 3: Divide the Resin and Add Color
Pour the mixed resin into separate smaller cups, one for each color. Leave some clear resin aside if you want softer transitions or a top coat effect.
Add resin-safe colorants a little at a time. Good options include epoxy pigments, mica powder, alcohol ink made for resin, and resin dye. Start with a tiny amount, mix thoroughly, then add more only if needed.
Do not overload the resin with colorant. Too much pigment can interfere with curing, create soft spots, or make the resin cloudy. A common beginner rule is to keep total colorant low, often under about 5–10% of the resin volume, depending on the product instructions.
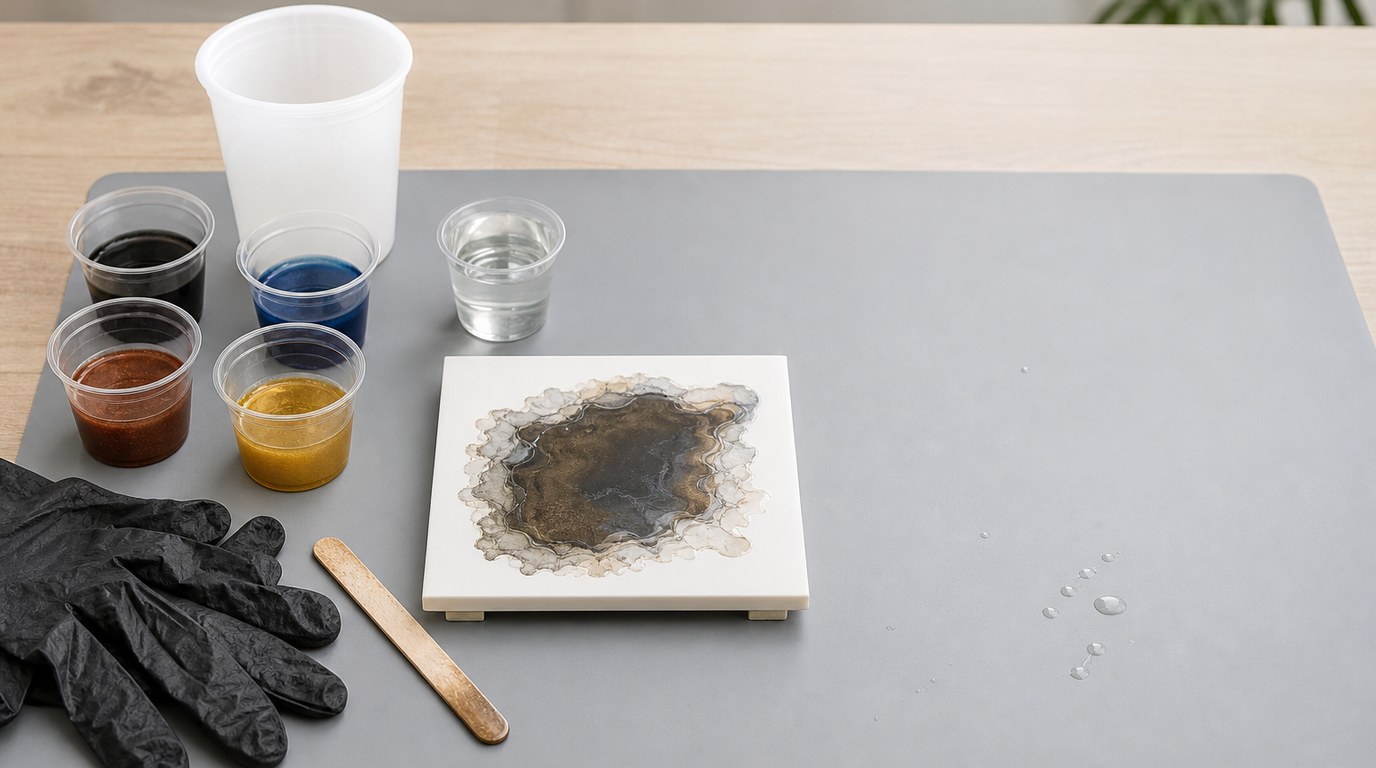
Step 4: Layer the Colors Into One Dirty Pour Cup
Choose one larger cup as your dirty pour cup. Instead of stirring all the colors together, you will layer them.
Pour a small amount of your first color into the cup. Add the next color directly on top or along the side of the cup. Continue alternating colors in thin layers. For more movement, pour from different heights or angles. For cleaner separation, pour slowly down the side of the cup.
Use your dominant color more often. Add metallics or very dark colors in smaller amounts because they can take over the design quickly. Do not stir the dirty pour cup. One gentle swirl is enough if you want extra movement.
Step 5: Pour the Epoxy Onto the Surface or Into the Mold
Move your prepared surface or mold close to the dirty pour cup. If you are coating a flat panel, start near the center and pour slowly. Let the resin spread, then move your hand in gentle lines, circles, or waves. If you are filling a mold, pour into the lowest or deepest area first and allow the resin to flow outward.
Keep the cup close to the surface for more controlled ribbons. Raise it slightly for thinner streams and more dramatic movement. Do not dump the whole cup at once unless you want a bold, unpredictable flood of color.
Use a stir stick or gloved finger to guide resin to the edges if coating a surface. For molds, avoid scraping unmixed residue from the bottom of your original mixing cup. If you need more coverage, use leftover clear or dominant-color resin rather than overworking the dirty pour.
Step 6: Pop Bubbles and Adjust the Design
After pouring, let the resin sit for a few minutes so bubbles can rise. Pass a torch or heat gun quickly over the surface to pop bubbles. Keep the heat tool moving and do not hold it too close. Too much heat can scorch resin, damage molds, create ripples, or push colors farther than intended.
Use a toothpick or stir stick to remove dust, hair, or stubborn bubbles. If you want to adjust the design, tilt the surface gently or drag a small line through the resin. Stop early. The more you manipulate a dirty pour, the more likely the colors are to blend into mud.
Step 7: Let the Dirty Pour Cure Properly
Cover the piece with a dust cover, box, or clean plastic container. Keep it level while it cures. Avoid moving it during the early cure stage because the design can slide or pool.
Follow the resin’s cure schedule. Some pieces can be demolded in 12–24 hours, while others need longer. Full cure may take several days. Temperature matters: a cool room slows curing, while excessive heat can shorten working time and increase bubbling.
Result Check: How to Know Your Dirty Pour Worked
Your dirty pour worked if the resin cures firm, glossy, and evenly, with distinct color movement still visible. The surface should not feel sticky, bendy beyond the resin’s normal flexibility, or oily.
Check the edges and deepest areas because those spots often reveal curing problems first. Look for balanced color distribution, clean ribbons, and no large trapped bubbles. A few tiny bubbles or unexpected color shifts are normal for beginner pours. If the design looks layered rather than muddy and the resin cured properly, the technique was successful.
Common Mistakes and Troubleshooting
If the colors turn muddy, you likely used too many colors, stirred the dirty pour cup, or overworked the resin after pouring. Next time, use fewer colors and separate strong opposites with white, clear, or metallic resin.
If the resin stays sticky or soft, the epoxy may have been measured incorrectly, mixed incompletely, or overloaded with colorant. Scrape the cup well while mixing and use resin-safe pigments sparingly.
If there are many bubbles, you may have stirred too fast, poured from too high, or used cold resin. Warm the resin bottles slightly in a warm water bath before mixing, if the manufacturer allows it, and stir slowly.
If colors sink or separate, the pigments may be too heavy or not compatible with epoxy. Use colorants made for resin and test new products in a small batch.
If the design slides to one side, your surface was not level. Level it before pouring, not after the resin is already curing.
FAQ
What Is the First Step Someone Should Take with Colored Dirty Pour Epoxy Tutorial?
Start by preparing your workspace and planning a simple color palette. Before mixing epoxy, make sure your mold or surface is clean, dry, level, and protected from dust. Then choose three to five compatible colors so the finished pour looks intentional instead of muddy.
What Can Go Wrong When Following Colored Dirty Pour Epoxy Tutorial Advice?
The most common problems are muddy colors, sticky resin, bubbles, and uneven curing. These usually come from using too many colors, inaccurate measuring, incomplete mixing, excess pigment, fast stirring, or an unlevel surface. Most issues are preventable with careful setup and slow, controlled handling.
How Long Does It Usually Take to Work Through Colored Dirty Pour Epoxy Tutorial?
The active work usually takes 30–60 minutes, depending on project size and how many colors you mix. Curing takes much longer. Many resins need at least 12–24 hours before handling or demolding, and several days before reaching a full cure.
How Can a Beginner Tell Whether Colored Dirty Pour Epoxy Tutorial Worked?
The piece should cure firm, glossy, and mostly bubble-free, with visible ribbons or marbling between colors. The surface should not feel sticky, oily, or soft. If the colors stayed distinct enough to show movement and the resin hardened correctly, your dirty pour worked.