If you want to copy a shape or make a custom part, making a mold for rubber is a simple project you can do at home. You can create a rubber mold by sealing your object inside a box, pouring liquid silicone or urethane rubber over it, and letting it cure. This process works for small crafts, replacement parts, or even creative art projects.
You don’t need special skills or expensive equipment. All it takes is a few basic supplies and some patience. Whether you want to fix something or try a new hobby, learning to make a rubber mold opens up a lot of possibilities for your own DIY projects.
Understanding the Basics of Rubber Mold Making
Rubber mold making lets you create detailed shapes for casting. It is used to make parts, art, and copies of original items using flexible rubber materials.
What Is Rubber Mold Making?
Rubber mold making is the process of creating a flexible mold from rubber to copy shapes and patterns. You use a model, often called the “original,” and pour liquid rubber around it. Once the rubber cures and hardens, you remove the model, leaving a mold that is ready for casting.
Rubber molds are popular because they can copy small details. The process is helpful for making identical parts or objects. You can use different techniques, such as block molding, brush-on molding, or using cut molds. Each method has its own tools, steps, and advantages.
Careful measuring and mixing are important so the rubber cures right. Most rubber mold making can be done at home with basic supplies and some patience.
Common Uses for Rubber Molds
Rubber molds have many practical uses at home and at work. You can use them to make soap, candles, and chocolates by pouring materials into the flexible rubber molds. Artists and craft makers use rubber molds for resin casting, making jewelry, or duplicating figurines and sculptures.
In manufacturing, rubber molds can help produce replacement parts for machines or create custom pieces. Hobbyists often make model parts, toy figures, or decorative items using casting processes and rubber molds.
Dental labs, special effects designers, and car restorers also use rubber molds all the time. Their flexibility allows for easy removal of the cast piece without damaging details.
Types of Rubber Used in Mold Making
There are several types of rubber you might use for mold making. The most common are silicone rubber and polyurethane rubber.
Silicone rubber is preferred for its flexibility, long shelf life, and ability to copy fine details. It is also heat resistant, which makes it good for molds that need to handle high temperatures, such as those for casting chocolate or wax.
Polyurethane rubber is another option. It is tougher and sometimes less expensive than silicone. However, it may not work well with certain casting materials like some resins or foods.
Here’s a simple comparison:
| Rubber Type | Pros | Cons |
|---|---|---|
| Silicone Rubber | Flexible, detailed, heat-proof | More expensive |
| Polyurethane | Durable, affordable | Not always food safe, less flexible |
Choose the right rubber based on what you want to cast, your budget, and the level of detail you need. Always follow the instructions on the rubber product for best results.
Essential Tools and Materials Needed

To make a rubber mold, you need to use the right type of rubber, prepare your workspace, and gather key equipment for safe, effective results. Knowing what to have on hand will help you avoid mistakes and finish your project faster.
Choosing the Right Rubber
Selecting the right rubber is important for a strong and flexible mold. Silicone rubber is popular because it captures fine details and is resistant to heat and chemicals. It is also easy to mix and pour. Other types include latex and urethane rubber, but silicone is the most user-friendly for most home projects.
Read the label before buying: some rubbers need to be mixed by weight, while others use simple 1:1 volume mixing. For soap, resin, candles, or plaster mold casting, silicone rubber is usually the best choice. Make sure the rubber you pick works for your project and is safe for your casting material.
Preparing Your Work Area
Before starting, cover your workspace with plastic or newspaper to avoid spills and stains. Choose a flat, sturdy table in a well-ventilated area since some rubber releases mild fumes. Keep the area free from dust, as dirt can get trapped in the mold.
You will need a mold box or container to hold the rubber and pattern. This can be a plastic food container, a wooden box, or a purpose-made mold box. Just make sure it has enough space around your object and does not leak. It is a good idea to keep paper towels and disposable gloves close by for quick clean-up.
Supporting Equipment and Safety Gear
Gather the necessary tools before you start. Most projects require:
- Mixing cups and wooden sticks
- A digital scale or measuring cups (for mixing silicone rubber)
- Craft knife or scissors
- Release agent (if casting from plaster or other non-silicone masters)
- Hot glue gun or modeling clay (to seal gaps in the mold box)
Wear nitrile gloves to protect your skin from sticky rubber. Safety glasses are helpful if you are pouring large batches or working with chemicals. An apron or old clothes will keep you safe from spills. Check that you have good ventilation to avoid breathing in any fumes, especially when working with certain rubbers or cleaning solvents.
Preparing Models and Mold Boxes
Getting your model and mold box ready is important for making a strong, clean mold. Careful work in these steps will help you get the best details and fewer problems later.
Model Preparation Techniques
Start by cleaning your model. Any dust, oil, or marks on its surface may ruin your mold. You can use mild soap and water for most models. For sculpted pieces, use a soft brush to remove dirt in small cracks.
Check the model for flaws such as cracks or loose parts. Fix them with glue or sculpting putty. If you’re using a material like clay, make sure it’s dry and not sticky.
Apply a release agent to your model, especially if it’s made of porous material. This helps the mold come off easily. Spray or brush on a thin, even layer and let it dry.
Place your model on a non-stick surface. Some people use a bit of double-sided tape to keep small models from shifting. If your model has parts sticking out, fill any gaps at the base with clay to block rubber from leaking underneath.
Building a Mold Box
A mold box holds the liquid rubber around your model while it cures. You can build one from plastic containers, acrylic sheets, or even sturdy cardboard. Just make sure the walls are smooth and won’t warp.
The mold box needs to fit closely around your model, but leave about ½ inch to 1 inch of extra space on all sides. Measure your model first and plan the box size before you start building.
Seal the edges and corners of the mold box well. Use hot glue, putty, or a strong tape to prevent the rubber from leaking out during pouring. For model railroad parts and sculpting work, a tight and even mold box is important to capture small details.
Check the box for leaks by pouring a small amount of water inside first. If any water escapes, seal the spots and test again. Let the box dry completely before you place your model inside and start working with rubber.
Applying Mold Release Agents
Using a mold release agent helps your rubber mold separate from patterns and casting materials. Picking the right product and using it correctly makes the process smoother and protects your mold from damage.
Choosing a Suitable Release Agent
Mold release agents come in several types. For rubber molds, common options include liquid soap, petroleum jelly, and commercial mold release sprays. Liquid soap mixed with water is a cheap and popular choice, especially for latex or silicone molds.
Petroleum jelly works well but can sometimes leave residue, which is why it should be applied in a thin layer. Commercial sprays are easy to apply and often leave less residue behind. If you are using a commercial product, check the label to make sure it is safe for your materials.
Some people also use vegetable oil or wax as a release agent, but these can interfere with casting materials or affect mold life. Always test your release agent on a small area before using it on the whole mold.
Proper Application Methods
Before applying a release agent, make sure your mold surface is clean and dry. Use a soft brush or lint-free cloth to spread the release agent evenly, especially if you are using petroleum jelly or a thick paste. Avoid applying too much, as excess can create bubbles or surface imperfections in your casting.
For liquid soap or spray releases, a light mist is usually enough. Hold the spray bottle about 6-8 inches from the mold and move in a steady motion to cover all surfaces. Let the release agent dry, if needed, before pouring rubber or casting material.
Remember to reapply the mold release agent each time you use the mold to keep parts from sticking and help the mold last longer. Clean the mold between uses to remove any buildup from previous applications.
Mixing and Pouring Rubber for Molds
Using rubber like silicone is a simple way to make strong, flexible molds. Paying attention while mixing and pouring helps you avoid common problems such as trapped air bubbles and uneven surfaces.
Mixing Silicone Rubber Effectively
Start by reading the instructions for your silicone rubber or Mold Max 30 kit. These products often use a two-part system. Wear gloves and work in a well-ventilated area.
Measure the base and catalyst carefully using a digital scale or marked cups. The right mix ratio is critical for your mold to cure properly.
Pour both parts into a clean container. Use a sturdy mixing stick or paddle. Stir slowly but thoroughly, scraping the sides and bottom often. This helps blend the material and prevents unmixed spots that can leave soft patches in your mold.
If your silicone is thick or has been sitting for a while, bubbles may form. You can tap the container gently to help pop them. A vacuum chamber will remove most bubbles, but if you don’t have one, mixing slowly is even more important.
Pouring Techniques for a Smooth Finish
Before pouring, make sure your original object and mold box are clean and dry. Apply a small amount of mold release if needed so your silicone doesn’t stick.
Pour the mixed rubber into the mold box slowly. Hold the container high, letting the silicone fall in a thin stream. This trick helps break up air pockets before they can get trapped.
Pour into the lowest corner of the box and let the silicone flow over the object. Don’t pour directly onto your model, as this can trap bubbles around details. Move slowly and avoid shaking the box while the rubber settles.
If you see bubbles rise, use a toothpick or lightly tap the box to help them escape. Always give the mold enough time to cure fully, following the instructions for your specific silicone rubber.
Curing, Demolding, and Troubleshooting
Getting your rubber mold just right means understanding when it has fully set, how to remove it safely, and how to handle common issues like air bubbles and flash during the process. Taking your time with each of these steps improves your results and helps prevent damage or frustration.
Curing Times and Factors
Curing is the time your rubber needs to set and harden into the finished mold. Most rubber mold materials have a specific curing time, which is listed on the package. This can range from 30 minutes to several hours, depending on the product you use.
Temperature plays a big part in how fast rubber cures. Warmer rooms help the rubber cure faster, while cold rooms slow it down. Mixing ratio is also important. For example, some silicone rubbers require an exact ratio by weight like 10:1. If you get the ratio wrong, the rubber might not cure at all.
Some things, like certain types of clay or resin, can react with the rubber and stop it from curing. It helps to seal your model with a layer of shellac or paint to avoid problems with cure inhibition. Always make sure to follow the instructions from the rubber manufacturer.
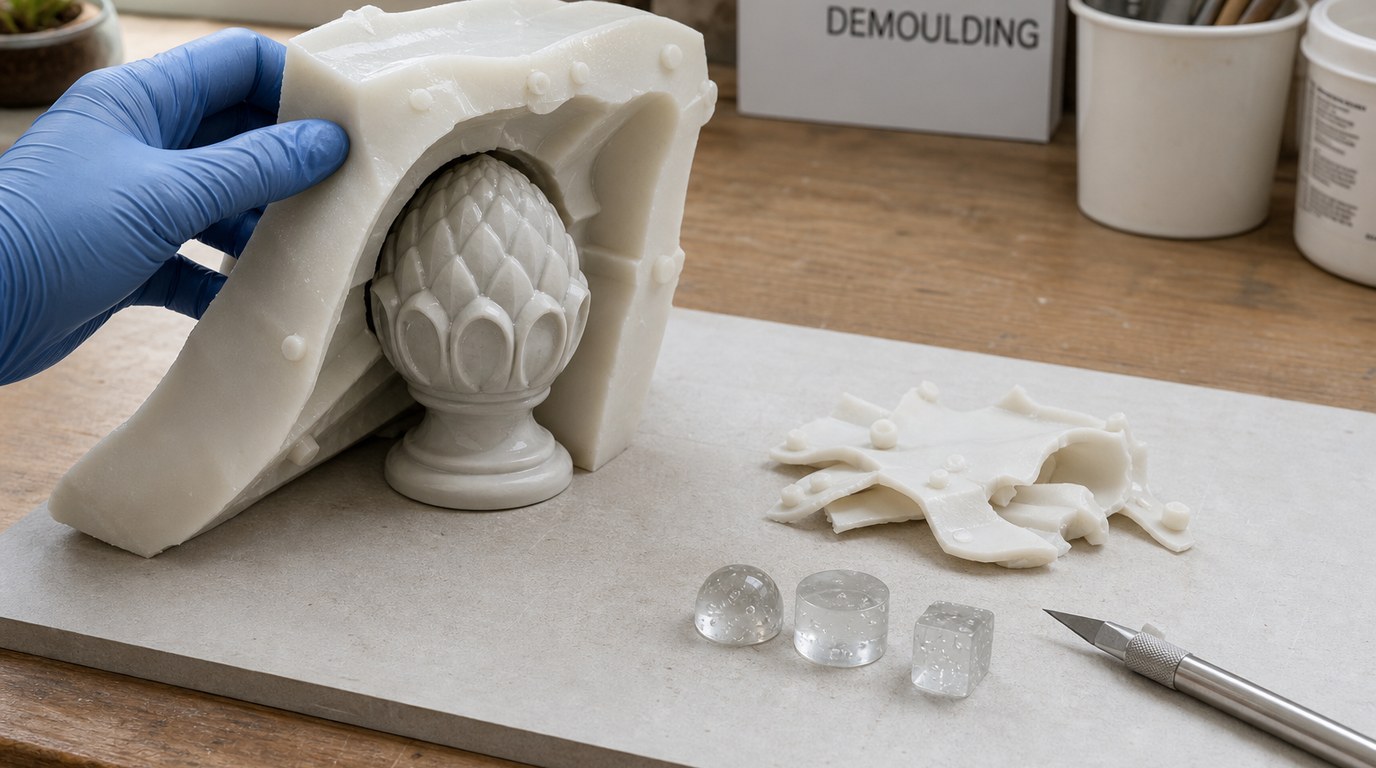
Demolding Without Damage
After your rubber mold is fully cured, it’s time to take it out of the container or off the model. Be gentle and do not rush. Carefully loosen the edges with your fingers or a wooden stick. Start from the corners to release trapped air bubbles and make removal easier. Do not use sharp tools because they can tear the mold.
If your mold shape has fine details or undercuts, pull slowly and wiggle the parts to loosen them. Adding a release agent before pouring the rubber can also make demolding easier and help your mold last longer. If you find your mold sticking, check if you need to use more release agent next time or if you need to let the mold cure longer.
Fixing Common Problems Like Flash and Air Bubbles
Air bubbles and flash are common problems. Air bubbles get trapped in the rubber while you mix or pour, creating holes or weak spots in the mold. To avoid this, mix slowly and tap the mold container on the table after pouring to bring bubbles to the surface.
You can also use a vacuum chamber if you have one to remove bubbles before casting. If you see bubbles on your mold’s surface, use a toothpick to pop them before the rubber sets.
Flash happens when extra rubber seeps out where the mold pieces meet. Cleaning up flash is easy. Just trim off the thin layer with small scissors or a craft knife after the mold cures. Avoid letting your rubber overflow the mold seams to prevent flash in the first place. Checking your mold edges and sealing gaps helps reduce this problem.
Creative Applications and Next Steps
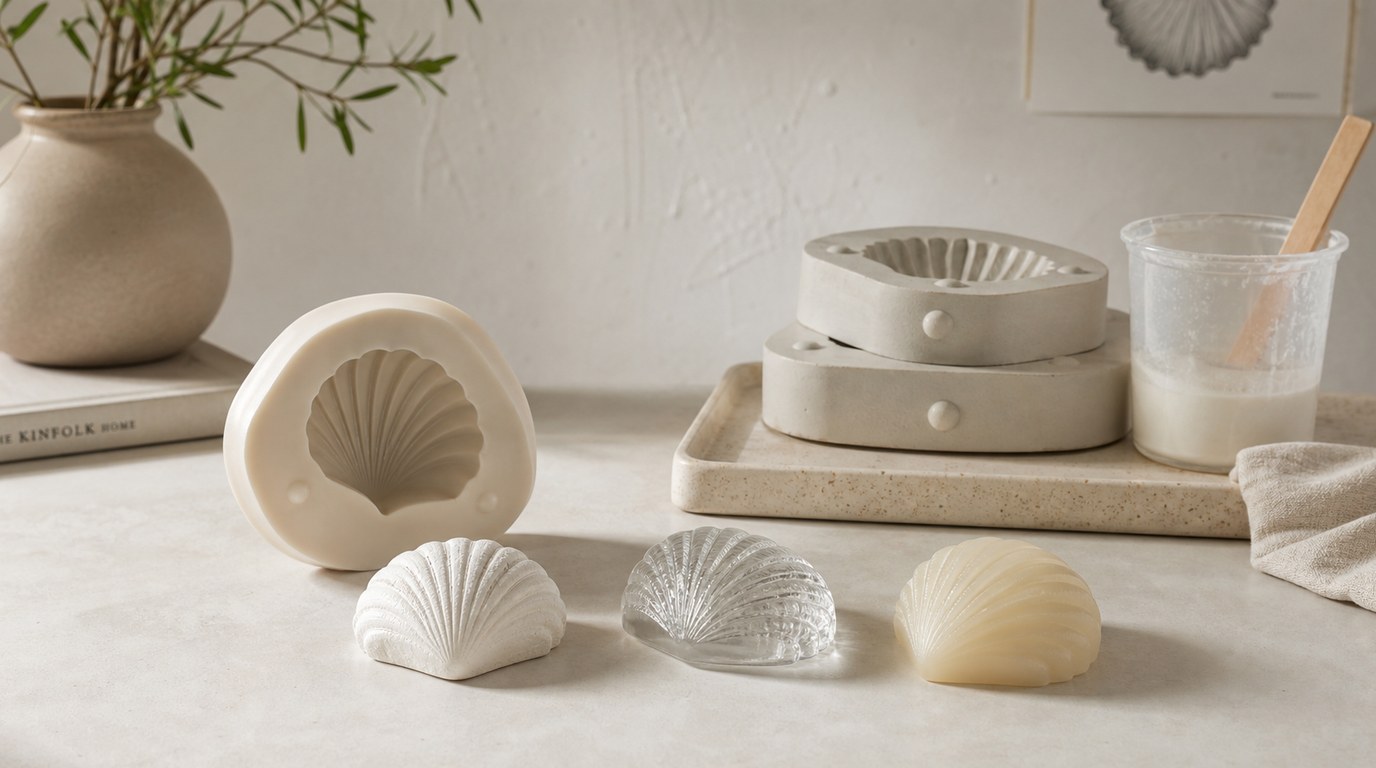
Once you have made your rubber mold, you can use it to cast new objects with different materials like resin, plaster, or even some types of wax. These rubber molds are flexible, reusable, and can help you make detailed copies of your chosen item.
Casting with Your New Rubber Mold
Casting is the next big step once your rubber mold is ready. You should always make sure your mold is clean and dry before you start pouring anything into it.
Most people use resin for casting. Resin creates strong, detailed pieces. Some resins can be tinted with color or even have things like glitter added for cool effects. Plaster is also a common choice. It is easy to use and works well for art or simple decorations.
Pour your casting material gently into the mold. Try to avoid bubbles by pouring slowly or tapping the mold. Once the material sets, carefully remove your new object from the rubber mold.
Rubber molds work best for small to medium objects. If you’re making lots of copies, you may need to clean the mold or apply mold release spray to keep details sharp.
Popular Projects and Ideas
With your rubber mold, you can make custom items for many uses. People cast jewelry pieces, game pieces, soap bars, keychains, or even small model parts.
For resin casting, molds are helpful for homemade dominoes, dice, and personalized ornaments. Crafters often use rubber molds to make unique candles, coasters, and fridge magnets.
Rubber molds are also great for restoring or duplicating missing parts, like antique buttons or hardware. They’re a favorite with artists and DIY fans because you can easily copy shapes with fine details.
Some people experiment by casting edible items like chocolate or fondant, but only do this if you use food-safe rubber and keep those molds just for food.