Clear epoxy resin is one of the best materials for turning a plain man cave bar into a custom centerpiece. It can seal wood, protect memorabilia, level uneven embedded objects, and create a glossy pub-style surface that still feels personal. The best man cave bar top ideas using clear epoxy resin usually fall into a few categories: sports themes, drink-related displays, rustic wood, game-room designs, collectibles, lighting effects, and sleek modern finishes.
The key is choosing a design that fits how the bar will be used. A heavy-use bar needs a flatter, easier-to-clean layout. A display-style bar can handle more embedded objects, as long as everything is sealed, level, and planned before the pour.
Why Clear Epoxy Resin Works so Well for Man Cave Bar Tops
Clear epoxy works because it acts like both a protective coating and a display case. Instead of hiding the surface underneath, it magnifies it and locks it in place under a durable, glossy layer.
That makes it ideal for man cave bars where the surface often needs to handle drinks, snacks, game nights, and conversation. You can preserve ticket stubs, labels, coins, wood grain, maps, or caps without leaving them exposed. The mental model is simple: build a flat, sealed design first, then use clear epoxy to protect and unify it.
Before You Pick a Design: Practical Bar Top Planning Tips
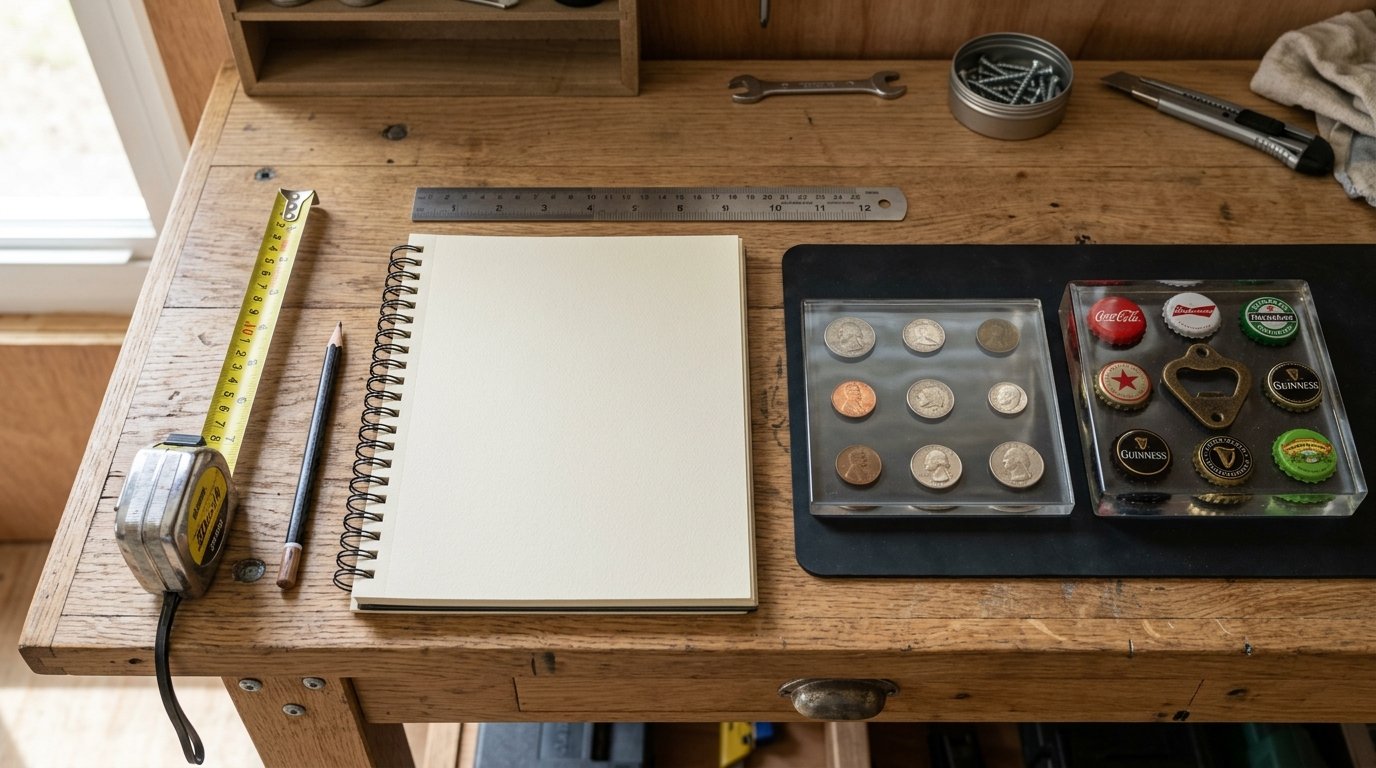
Before choosing a theme, decide how the bar will be used. If it is a daily hangout spot, prioritize smooth layouts, simple cleaning, and fewer deep gaps. If it is more of a showpiece, you can use thicker objects like coins, caps, or small tools.
Measure the bar top carefully and sketch the design before placing anything permanently. Dry-fit your objects, check spacing, and make sure the edges are contained with a proper dam or raised trim. Porous items like paper labels, maps, photos, and raw wood should be sealed first so they do not release bubbles or darken unevenly under the epoxy.
Quick Comparison of Clear Epoxy Man Cave Bar Top Ideas
Use this quick comparison to narrow your direction before diving into the detailed ideas.
| Idea | Best For | Difficulty | Practical Tip |
|---|---|---|---|
| — | — | —: | — |
| Sports memorabilia | Team-focused bars | Medium | Seal paper items first |
| Bottle caps | Classic pub style | Medium | Use a grid or pattern |
| Labels | Whiskey or beer fans | Easy | Keep paper flat |
| Live edge wood | Rustic rooms | Medium | Fill cracks before final coat |
| LED-lit epoxy | Modern bars | Hard | Plan wiring first |
| Coins or tokens | Collectors | Medium | Level carefully |
| Minimal clear coat | Clean, simple bars | Easy | Let wood be the feature |
1. Sports Memorabilia Bar Top
A sports memorabilia bar top is perfect for a team-themed man cave. You can embed ticket stubs, trading cards, printed logos, photos, pennant pieces, or replica programs under clear epoxy.
This design suits fans who want the bar to feel like a personal highlight reel. The main build tip is to use copies of valuable items, not originals. Paper can wrinkle, bleed, or shift during resin work. Seal everything with a compatible clear sealer, glue it flat, and pour a thin seal coat before the deeper flood coat.
2. Bottle Cap Bar Top
The bottle cap bar top is a classic for a reason: it looks like a real pub surface and gives you endless color options. It works especially well in beer-themed, sports-themed, or basement bars.
To make it look intentional rather than cluttered, arrange caps by brand, color, logo direction, or repeating rows. Random layouts can work, but they still need consistent spacing. Caps trap air underneath, so glue them down securely and consider filling them first or pouring in stages to reduce bubbles and floating.
3. Beer Label or Whiskey Label Bar Top
Beer labels and whiskey labels create a flatter, cleaner version of the bottle cap idea. This is a strong choice if you want a pub-style bar without the thickness of embedded caps.
It suits collectors, home brewers, bourbon fans, or anyone with favorite local breweries. The main challenge is paper behavior. Remove labels carefully, press them flat, and seal both sides before installation. Lay them in straight rows, overlapping collage style, or grouped by distillery or region for a more curated look.
4. Live Edge Wood with Clear Epoxy
A live edge wood bar top gives a man cave a rustic, lodge, or cabin feel. Clear epoxy enhances the grain, fills knots and cracks, and protects the surface without covering the natural character.
This idea suits rooms with leather seating, dark walls, stone accents, or industrial lighting. The practical tip is to stabilize the wood first. Sand it flat, remove loose bark, fill large voids in smaller pours, and seal the slab before the final clear coat. Clear resin should make the wood look deeper, not plastic-coated.
5. Map, Route, or Hometown Bar Top
A map bar top adds a personal story without needing bulky objects. You can use a hometown street map, a favorite road trip route, a lake map, a hunting area, a stadium district, or a map of places visited.
This design suits man caves built around travel, family history, military service, or local pride. Use a high-quality print sized to the bar top, then seal it thoroughly before pouring. For extra detail, mark locations with small pins, painted dots, or thin metallic lines before the epoxy coat.
6. Poker, Casino, or Game Night Bar Top
A poker or casino bar top works well when the man cave doubles as a game room. Cards, poker chips, dice, felt-style graphics, or printed table layouts can all sit under clear epoxy.
This idea suits people who host card nights, pool games, darts, or fantasy draft parties. Keep the surface practical by avoiding objects that sit too high unless you plan a thicker pour. Glue cards and chips in place before pouring, and test the arrangement from the guest side of the bar, not only from behind it.
7. Led-lit Clear Epoxy Bar Top
An LED-lit epoxy bar top creates a modern, high-impact look, especially in darker rooms. Lighting can go under a translucent edge, behind a river channel, or beneath frosted acrylic sections sealed under clear resin.
This suits tech-forward, theater-style, or nightclub-inspired man caves. The most important tip is to plan the wiring before the epoxy work starts. LEDs need access for power and future repair. Do not permanently bury components you may need to replace. Use channels, removable panels, or edge lighting whenever possible.
8. Metallic Accent Clear Epoxy Bar Top
Metallic pigments can add movement and depth without turning the entire surface opaque. The best version uses clear epoxy as the main finish, with metallic accents in borders, cracks, logo areas, or river-like channels.
This idea suits modern, industrial, or luxury-style bars. Use restraint. Too much pigment can hide the wood or embedded design underneath. Mix small amounts of bronze, silver, copper, black, or team-color metallics into accent pours, then finish with a clear flood coat so the final surface still reads as clean and glassy.
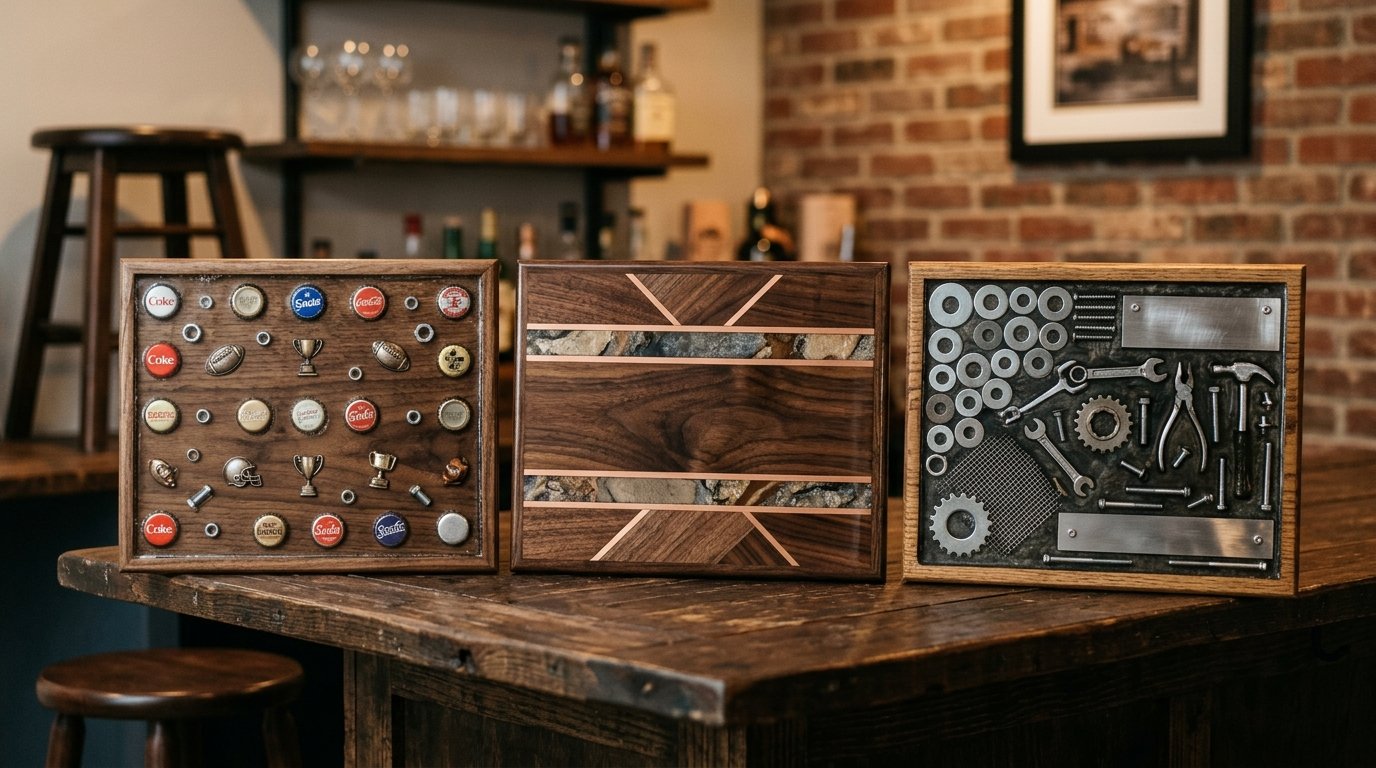
9. Coin, Token, or Military Challenge Coin Bar Top
Coins, tokens, and challenge coins create a heavy, collectible display that looks substantial under clear epoxy. This idea works for military-themed rooms, arcade bars, travel collections, or family coin jars.
It suits collectors who want the bar to tell a story piece by piece. Weight and leveling matter here. Coins can shift if they are not glued down, and thicker challenge coins may need deeper resin. Arrange them with consistent spacing, use a straightedge or template, and pour in layers if the height difference is significant.
10. Faux Stone, Concrete, or Marble Look with a Clear Epoxy Finish
If you want a high-end bar top without embedding objects, create a faux stone, concrete, or marble surface and seal it with clear epoxy. This gives the bar a clean, upscale look while still benefiting from resin’s gloss and protection.
It suits modern man caves, whiskey lounges, or sports bars with a more polished feel. The build tip is to perfect the base layer before the clear coat. Paint, trowel, or stain the faux finish first, let it cure fully, then apply clear epoxy as the protective top layer.
11. Tools, Garage, or Workshop-inspired Bar Top
For an automotive, garage, or workshop man cave, clear epoxy can seal small tools, washers, nuts, gears, keys, badges, or metal nameplates into the bar top. The result feels rugged and personal.
This design suits mechanics, woodworkers, DIYers, and car enthusiasts. Keep comfort in mind: a bar top still needs to be smooth for glasses and elbows. Choose thinner items where possible, clean off oil or grease, and glue everything firmly. Rusted or sharp objects should be sealed or avoided unless they are safely buried below the final surface.
12. Minimal Clear Coat Over Statement Wood
Not every man cave bar needs a busy theme. A minimal clear coat over walnut, oak, maple, reclaimed barn wood, or butcher block can look more expensive than a heavily decorated surface.
This idea suits readers who want durability, warmth, and a clean backdrop for the rest of the room. The practical tip is to spend more time preparing the wood than decorating it. Sand evenly, remove dust, seal knots and end grain, and use clear epoxy to highlight the natural grain rather than distract from it.
How to Choose the Best Idea for Your Man Cave Bar
Start with the room style. A sports room can handle memorabilia or bottle caps; a whiskey lounge may look better with labels, dark wood, or faux stone; a garage bar fits tools, badges, or metal accents.
Next, match the idea to your skill level. Beginners should consider labels, minimal wood coats, or faux finishes. Intermediate builders can try bottle caps, coins, maps, or live edge slabs. LED layouts and deep embedded objects require more planning.
Finally, think about maintenance. If people will eat, drink, and lean on the bar often, choose a flatter design with fewer height changes and a strong final clear coat.
Common Clear Epoxy Bar Top Mistakes to Avoid
The biggest mistake is rushing the layout. Once epoxy is poured, crooked labels, floating caps, and uneven spacing are hard to fix. Dry-fit everything first.
Do not pour over unsealed paper, dusty wood, oily metal, or loose objects. These can cause bubbles, stains, adhesion problems, or shifting. Also avoid pouring too thick unless the resin is designed for deep pours. For most bar tops, controlled layers create a clearer, flatter, more reliable result.
FAQ
What Should a Beginner Know First About Man Cave Bar Top Ideas Using Clear Epoxy Resin?
Beginners should know that the design under the epoxy matters as much as the resin itself. Start with a flat, sealed, well-planned layout. Labels, maps, and clear-coated wood are easier first projects than thick bottle caps, LEDs, or heavy embedded objects.
What Matters Most When Evaluating Man Cave Bar Top Ideas Using Clear Epoxy Resin?
The most important factors are bar use, object thickness, surface flatness, and room style. A display bar can be more decorative, while a high-use bar should be smoother and easier to clean. Choose a design that looks good and still functions comfortably.
What Mistakes Should Readers Avoid with Man Cave Bar Top Ideas Using Clear Epoxy Resin?
Avoid using unsealed paper, loose objects, oily metal, or poorly planned layouts. Also avoid burying electrical parts permanently in LED designs. Most problems come from rushing preparation, skipping seal coats, or pouring too much resin at once.
What Is the Next Logical Step After Learning About Man Cave Bar Top Ideas Using Clear Epoxy Resin?
Pick one design direction, measure your bar top, and sketch the layout to scale. Then gather sample materials and test a small resin pour before committing to the full bar. A test board helps confirm color, clarity, bubbles, and object placement.