Sanding epoxy resin works best when the resin is fully cured, the surface is supported, and you move through grits gradually. Start with the least aggressive grit that will remove the problem, sand evenly, clean between grit changes, then wet sand with finer grits for a smoother surface. Sanded resin usually looks cloudy at first; shine comes back with polishing compound, a clear top coat, or another thin layer of resin. Wear a respirator or dust mask, protect your eyes, and avoid overheating the resin while sanding.
Before You Start: Make Sure the Resin Is Ready
Do not sand epoxy resin until it is fully cured. Resin that feels rubbery, tacky, or slightly flexible can clog sandpaper, smear across the surface, and cure unevenly after you disturb it. Check your resin brand’s cure time, then allow extra time if the piece is thick, the room was cool, or you used pigments.
The surface should feel hard, dry, and non-sticky before sanding. If your fingernail leaves a dent, wait longer. If the resin is still tacky after the full cure window, sanding is not the fix; you may need to remove uncured resin or seal it with a properly mixed fresh coat.
Work in a ventilated area and decide whether you need dry sanding, wet sanding, or both. Dry sanding shapes and levels. Wet sanding refines the surface and reduces dust.
Supplies You Need for Sanding Epoxy Resin
Gather everything before you start so you do not contaminate the surface between steps.
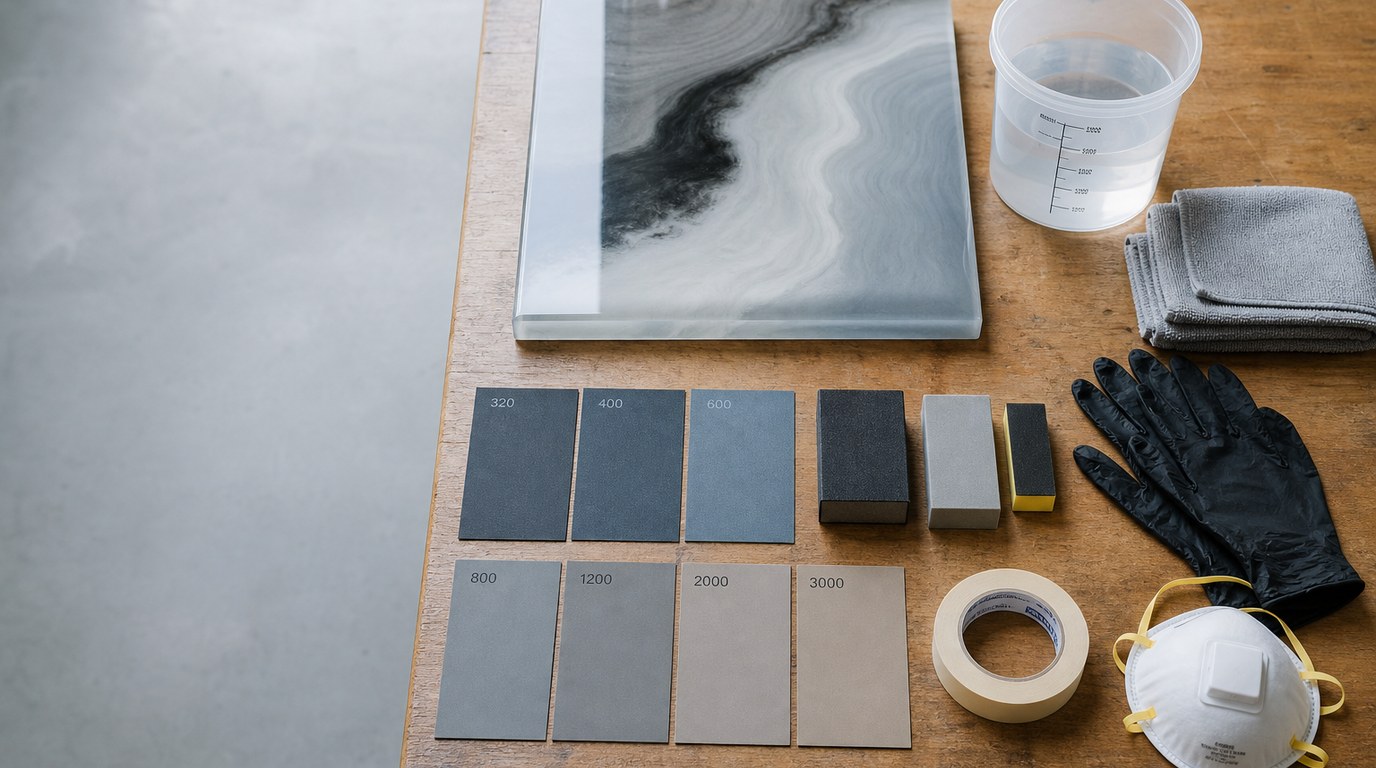
You will need:
- Wet/dry sandpaper in multiple grits
- A sanding block or soft backing pad
- Water and a small container or spray bottle for wet sanding
- Microfiber cloths or lint-free towels
- Respirator or dust mask rated for fine particles
- Safety glasses
- Nitrile gloves
- Polishing compound or resin polish
- Optional: electric sander, buffing pad, painter’s tape
Use wet/dry sandpaper if you plan to wet sand. Regular paper-backed sandpaper can fall apart in water. For flat pieces, a sanding block helps prevent dips. For curved pieces, use a flexible pad and light pressure.
Step 1: Choose Your Starting Grit
Your starting grit depends on how much material you need to remove. Avoid starting too coarse unless the resin has heavy ridges, drips, uneven edges, or deep scratches.
For minor surface dullness, start around 800 to 1000 grit. For small scratches or uneven texture, start around 400 to 600 grit. For rough edges, high spots, or cured drips, you may need 120 to 320 grit first.
The goal is to use the finest grit that still solves the problem. Coarse grits remove resin quickly, but they also leave deeper scratches that take more work to erase. If you are unsure, test a small hidden area. If the grit barely changes the surface after a minute, move one step coarser.
Step 2: Sand the Resin Evenly
Place the resin on a stable, clean surface. If you are sanding a flat top, wrap the sandpaper around a sanding block. This keeps pressure even and prevents your fingertips from creating grooves. For edges or curves, use a soft pad or fold the paper so it follows the shape.
Sand with light to moderate pressure. Let the abrasive do the work. Pressing hard can create heat, uneven spots, and cloudy scratches that are difficult to remove. Move in overlapping strokes rather than staying in one place.
For flat surfaces, sand in one direction for the first grit. Keep the paper moving across the whole area, including edges, so you do not create a low spot in the center. If dust builds up, stop and wipe it away. Clogged sandpaper scratches more and cuts less.
Step 3: Move Through Finer Grits in Order
After the first grit has leveled the problem, move to the next finer grit. A typical progression might be 320, 400, 600, 800, 1000, 1500, 2000, then 3000 grit. You do not always need every number, but you should not make huge jumps.
Each grit removes the scratches from the grit before it. If you skip from 320 straight to 1500, the fine paper will polish the tops of the scratches instead of removing them. The surface may look smooth at first, then show lines after polishing.
Change sanding direction slightly with each grit. For example, sand left to right with 400 grit, then front to back with 600 grit. This makes it easier to see whether the previous scratches are gone. Clean the resin and the sandpaper between grits so coarse particles do not carry forward.
Step 4: Wet Sand for a Smoother Finish
Wet sanding is best for the finer stages, usually from about 600 or 800 grit upward. It keeps dust down, reduces clogging, and helps create a more even finish. Use only wet/dry sandpaper.
Dip the paper in water or mist the resin surface. Sand gently in small overlapping motions, keeping the surface wet. You should see a light milky slurry form. That is normal; it is water mixed with fine resin particles. Rinse or wipe it away often so you can check your progress.
Do not wet sand near exposed wood, paper, photos, or unsealed inclusions that could absorb moisture. If the resin is attached to another material, protect it with painter’s tape or sand carefully by hand. Avoid power tools with water unless the tool is designed for wet use.
Step 5: Clean and Inspect the Sanded Resin
Before polishing or sealing, clean the resin thoroughly. Rinse off wet sanding slurry or wipe dry sanding dust with a damp microfiber cloth. Then dry the piece completely with a lint-free towel.
Inspect the surface under bright light from more than one angle. Look for shiny low spots, deep scratches, cloudy patches, or uneven edges. A uniformly sanded surface should have an even matte appearance before polishing. If you still see scratches from an earlier grit, go back one or two grits and remove them before continuing.
Do not polish over obvious sanding marks. Polishing can make them more visible, not less.
Step 6: Restore Shine After Sanding
Freshly sanded epoxy resin often looks dull or cloudy. That does not mean you ruined it. Sanding creates tiny scratches, and shine returns when those scratches are refined or filled.
For a glossy finish, polish the resin after sanding to at least 2000 or 3000 grit. Apply a small amount of resin polishing compound and buff by hand with a microfiber cloth or use a foam buffing pad at low speed. Keep the pad moving and avoid heat buildup.
If the shine still looks hazy, it helps to polish resin after sanding with light pressure and steady, patient buffing.
Another option is to apply a fresh clear coat of resin or a compatible clear sealant. This can restore deep gloss, especially on art pieces, trays, and tabletops. Make sure the sanded surface is clean and dry before coating.
Common Mistakes When Sanding Epoxy Resin
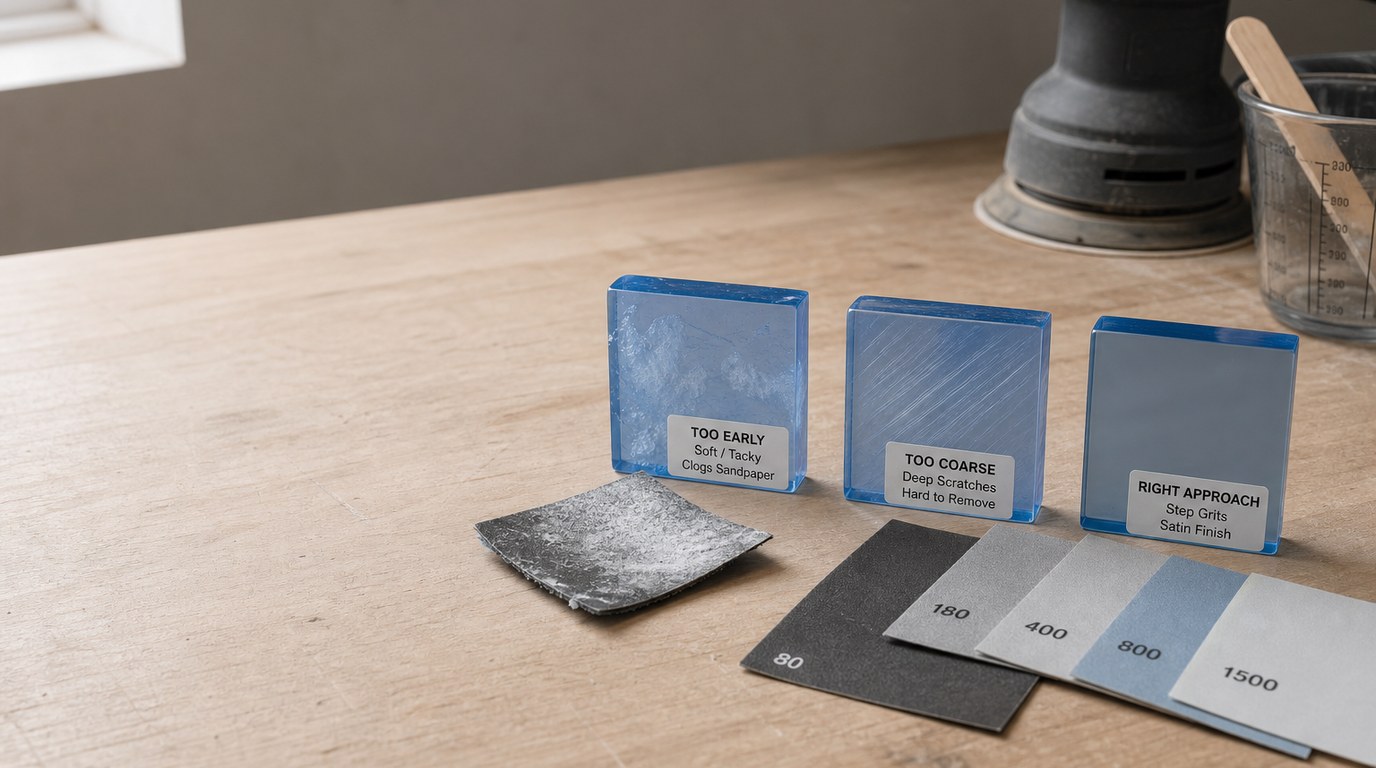
Starting too early is the biggest mistake. Soft resin gums up sandpaper and may never sand cleanly. Wait until it is fully cured.
Using the wrong starting grit also causes problems. Too coarse creates unnecessary scratches. Too fine wastes time and fails to level bumps.
Skipping grits is another common reason resin looks scratched after polishing. Move gradually and remove the previous grit marks before continuing.
Too much pressure can create uneven sanding, heat, and edge rounding. Use light pressure and steady movement.
Dirty sanding water, clogged paper, or leftover coarse dust can scratch later stages. Clean between grits.
Finally, do not expect sanding alone to produce gloss. Sanding smooths and levels; polishing, buffing, or a clear coat restores shine.
How to Know You Sanded the Resin Correctly
You sanded the resin correctly when the surface feels smooth, the shape is even, and there are no visible deep scratches under angled light. Before polishing, the finish should look consistently matte rather than patchy. After polishing or coating, the resin should appear clear and glossy, with no cloudy streaks, swirl marks, or uneven dull areas.
FAQ
Can You Sand Epoxy Resin?
Yes, you can sand epoxy resin after it has fully cured. Sanding is useful for removing rough edges, drips, bubbles at the surface, scratches, and uneven areas. Always wear eye protection and a respirator or dust mask, especially when dry sanding.
Should I Wet Sand or Dry Sand Epoxy Resin?
Use dry sanding for shaping, leveling, or removing larger flaws. Use wet sanding for finer grits when you want a smoother finish and less airborne dust. Many projects need both: dry sand first if needed, then wet sand through the polishing grits.
Why Does My Resin Look Cloudy After Sanding?
Cloudiness after sanding is normal because sandpaper leaves tiny scratches that scatter light. The finer the grit, the less cloudy it becomes. To restore clarity and shine, continue through higher grits, then polish with compound or apply a fresh clear coat.
What Grit Sandpaper Should I Use Before Polishing Resin?
Before polishing, sand to at least 2000 grit for a good shine. For a clearer, glossier finish, go to 3000 grit or higher if available. If scratches remain before polishing, return to a lower grit and work back up gradually.
Can I Use an Electric Sander on Epoxy Resin?
Yes, but use caution. An electric sander can remove resin quickly and may create heat, swirl marks, or uneven spots. Use light pressure, keep the sander moving, and start with a conservative grit. For small pieces, edges, and final grits, hand sanding is usually safer.