
Air bubbles in epoxy resin usually come from trapped air introduced during mixing, pouring, or curing. Resin is thick, so once air gets folded into it, bubbles can rise slowly or get stuck before the resin hardens. Bubbles can also come from porous materials, cold resin, deep molds, dry flowers, wood, paper, or anything that releases air into the pour.
The good news: most bubbles are preventable. Warm your resin slightly, seal porous items, mix slowly, pour in a thin stream, and remove bubbles while the resin is still wet. If bubbles have already cured, you usually need to sand, fill, dome, or recoat the surface rather than “pop” them.
The Simple Reason Epoxy Resin Gets Air Bubbles
Think of epoxy resin as a thick liquid with a countdown timer. When you combine resin and hardener, you start the curing reaction. During the working time, air can still escape. Once the resin thickens, bubbles slow down and may become trapped.
Bubbles enter in two main ways: you add them, or the project releases them. You add air by whipping the mixture, scraping too aggressively, pouring from too high, or stirring with a tool that splashes. Your project releases air when resin soaks into wood grain, paper, dried flowers, unsealed clay, or textured molds.
The thicker and colder the resin is, the harder it is for bubbles to rise before curing.
The Most Common Causes of Air Bubbles in Epoxy Resin
The most common cause is mixing too fast. Stirring resin like cake batter folds air into the mixture. Scraping the cup is necessary for accurate mixing, but frantic scraping can also create tiny bubbles throughout the batch.
Cold resin is another major cause. When resin is cool, it becomes more viscous, almost like honey on a cold day. Thick resin traps bubbles, especially in small molds, coaster pours, and clear castings where every bubble is visible.
Porous materials are a frequent surprise. Wood, dried flowers, paper, cork, fabric, and some stones can release air after the resin is poured. This often looks like bubbles rising from one specific object or edge.
Deep pours and complicated molds can also trap air. Sharp corners, lettering, undercuts, bezels, and charm molds create pockets where resin flows around air instead of pushing it out.
Finally, overheating or using too much torch heat can create new problems. Heat helps bubbles pop at the surface, but too much heat can make resin ripple, smoke, yellow, or cure unevenly. Bubble control is about gentle prevention, not aggressive rescue.
Quick Troubleshooting Table: Cause, Appearance, and Prevention
| What you see | Likely cause | Best prevention |
|---|---|---|
| Many tiny bubbles throughout | Fast mixing or cold resin | Warm bottles slightly and stir slowly |
| Bubbles rising from wood or flowers | Porous material releasing air | Seal items before embedding |
| Bubbles stuck in corners | Mold shape trapping air | Pour slowly and guide resin with a toothpick |
| Surface bubbles only | Normal trapped air reaching the top | Use gentle heat or alcohol mist if compatible |
| Large gaps or voids after curing | Air pocket in mold or under object | Tilt mold, pour in layers, release trapped air |
How to Prevent Bubbles Before You Pour

Start by setting up the project so air has fewer places to hide. If you are working with wood, dried flowers, paper, photos, fabric, or clay, seal them first with a compatible sealer or a thin coat of resin. Let that sealing layer cure or become tacky according to your project plan. This prevents air from escaping into the main pour.
Bring your resin to a comfortable room temperature before mixing. Many crafters place closed resin bottles in a warm water bath for a few minutes, then dry the bottles completely before opening them. Do not use boiling water, and do not let water get into the resin.
Choose the right resin for the project. A thin coating resin is not the same as a deep-pour casting resin. If you pour a resin deeper than recommended, it may cure too hot or trap bubbles.
Prepare molds by checking corners, details, and dust. For detailed molds, consider brushing a tiny amount of resin into the deepest areas before filling the rest.
How to Mix and Pour Epoxy Resin with Fewer Bubbles
Measure according to the resin’s instructions, then mix slowly and deliberately. Scrape the sides and bottom of the cup, but avoid whipping. Your goal is complete blending, not speed. A flat stir stick often creates fewer bubbles than a round stick because it moves resin without beating it.
If your instructions allow it, use a two-cup mixing method: mix in the first cup, transfer to a second clean cup, then mix again briefly. This helps avoid unmixed resin clinging to the cup walls.
Let the mixed resin rest for a minute or two if your working time allows. Some bubbles will rise on their own.
When pouring, pour in a thin, steady stream close to the mold or surface. For coasters, pour near one edge and let resin spread. For charms or detailed molds, add a small amount first, use a toothpick to guide resin into corners, then continue filling. For clear castings, pour in layers when needed instead of forcing one thick pour.
How to Remove Bubbles While the Resin Is Still Wet
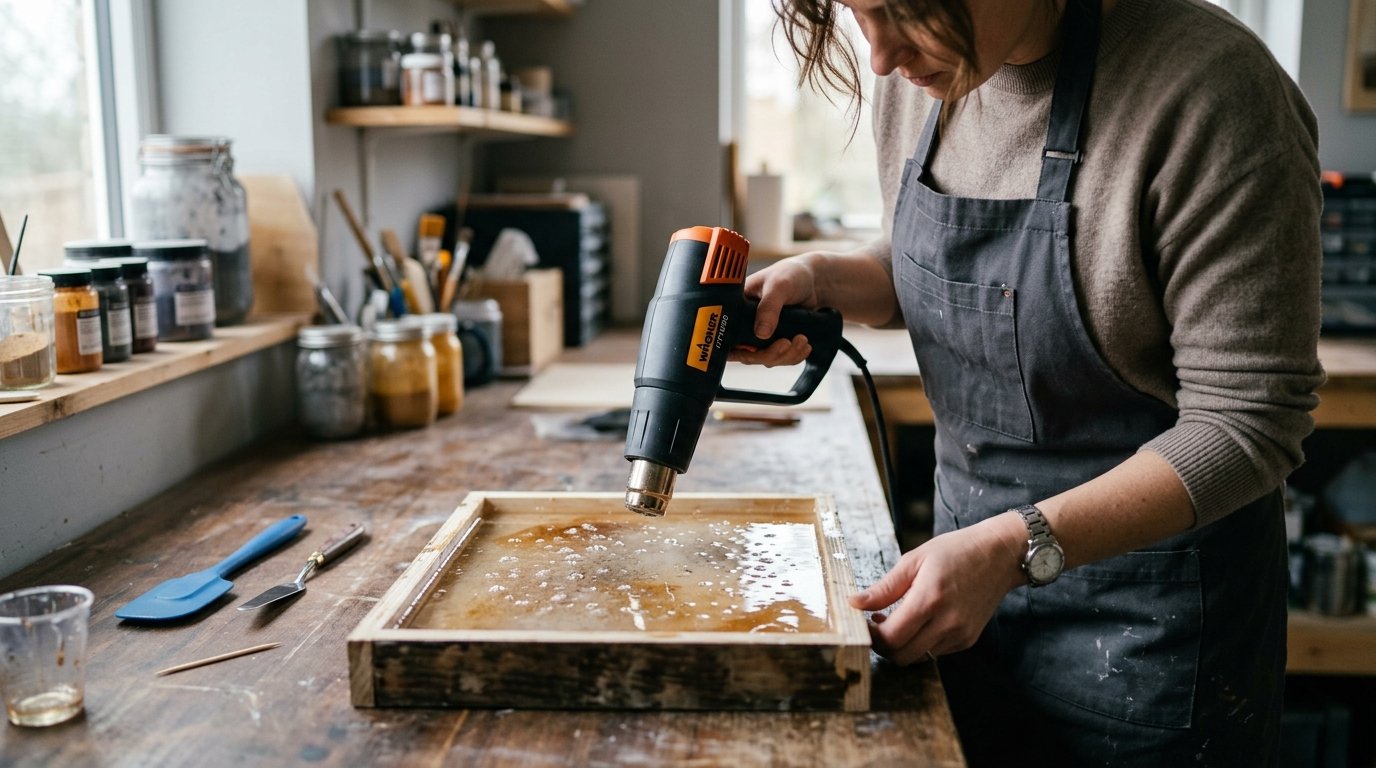
Wet resin gives you the best chance to remove bubbles. After pouring, wait a few minutes so bubbles can rise, then use gentle heat at the surface. A heat gun, torch, or lighter can pop surface bubbles, but keep it moving and do not overheat one spot.
For small molds, a toothpick, skewer, or silicone tool is often safer than heavy heat. Drag trapped bubbles out of corners, around dried flowers, or from under charms.
You can also tap the mold lightly on the table to encourage bubbles to rise. Do this carefully so resin does not spill over the sides.
Some makers use a fine mist of isopropyl alcohol for surface bubbles, but this depends on the resin brand and project. Test first, because alcohol can affect shine, color, or curing if overused.
Can You Fix Air Bubbles After Epoxy Resin Cures?
Once epoxy resin cures, trapped bubbles are solid voids. You cannot pop them anymore, but you can repair or disguise many of them.
If bubbles are on the surface, sand the area smooth, clean away dust, and apply a fresh clear coat or dome coat. If bubbles are shallow pits, fill them with a small amount of mixed resin, let it level, and cure.
For bubbles inside a clear casting, repair is harder. You may be able to drill and fill a large visible void, but tiny internal bubbles usually remain. In that case, sanding and recoating can improve the finish, but it will not remove bubbles suspended deep inside the piece.
What Bubble Patterns Can Tell You About What Went Wrong
Bubble patterns are useful clues. Tiny bubbles evenly spread through the piece usually point to fast mixing or cold resin. Bubbles clustered around flowers, wood, paper, or charms suggest the item released air or was not sealed.
Bubbles along mold edges often mean air was trapped in corners during pouring. A foamy surface can mean overworking, overheating, or using a tool that introduced too much air. Large empty pockets usually come from undercuts, deep details, or objects placed in the mold before resin could flow underneath them.
FAQ
What Should a Beginner Know First About Why Are There Air Bubbles in Epoxy Resin?
Beginners should know that bubbles are normal, especially in early projects. Epoxy resin is thick, and air can enter while mixing, pouring, or embedding objects. Focus first on slow mixing, warm resin, sealed materials, and removing bubbles while the resin is still wet.
What Matters Most When Evaluating Why Are There Air Bubbles in Epoxy Resin?
The most important clues are where the bubbles appear and when you notice them. Bubbles throughout the resin suggest mixing or temperature problems. Bubbles around objects suggest trapped air from porous materials. Bubbles in corners usually point to pouring technique or mold shape.
What Mistakes Should Readers Avoid with Why Are There Air Bubbles in Epoxy Resin?
Avoid whipping the resin, pouring cold resin, skipping the sealing step for porous items, and overheating the surface with a torch. Also avoid waiting too long to remove bubbles. Once resin thickens or cures, bubbles become much harder to fix cleanly.
What Is the Next Logical Step After Learning About Why Are There Air Bubbles in Epoxy Resin?
The next step is to troubleshoot one project at a time. Note your resin temperature, mixing speed, mold type, and embedded materials. On the next pour, change one factor, such as sealing flowers or warming resin, so you can see what actually improves the result.