
To create realistic resin ocean waves, plan a simple shoreline, pour transparent blues from shallow to deep water, then add a thin line of opaque white resin for foam. Push the white with controlled heat instead of stirring it in. Build depth with multiple thin layers, letting each pour cure properly before adding the next. The best ocean effects come from restraint: less pigment, less white, less heat, and a clear wave direction that reads naturally on a beach panel, tray, coaster set, or wall art piece.
That same patient approach is the heart of layering resin for depth, especially when each clear pour needs time to settle and cure.
Quick Reader Path: the Ordered Process
- Prepare a safe, level, sealed work surface.
- Sketch or visualize the beach, shallow water, deep water, and wave line.
- Mix clear resin plus separate transparent blue tones.
- Pour blues from light near shore to dark in deeper water.
- Add a thin opaque white foam line.
- Push the white with short, controlled heat bursts.
- Let the layer cure, then add offset wave layers if desired.
- Check for lacing, depth, a hard cure, and a clean glossy finish.
Before You Start: What Makes Resin Ocean Waves Look Realistic
Resin ocean waves look believable when they are built with layers, transparency, and controlled movement. The water should have depth, not just a single blue surface, and the foam should look like it is moving across the shore.
The white wave foam is the easiest part to overdo. Add it sparingly, then push it over the blue resin rather than overmixing it. This guide focuses on five practical tips you can apply to a beach panel, tray, coaster set, or ocean wall art piece.
Prerequisites: Surface, Safety, and Resin Readiness
Before mixing resin, set up a ventilated, dust-controlled workspace and follow the safety directions for your resin brand. Wear gloves, protect your table from drips, and keep pets, hair, and loose fibers away from the curing piece.
Seal porous surfaces before pouring. Wood, canvas, sand effects, shells, and textured beach areas can release bubbles into wet resin if they are not sealed first. Also check that your work surface is level; even a small tilt can make the ocean layer slide to one side.
Have pigments, mixing cups, stir sticks, a heat tool, paper towels, and cleanup supplies ready before you start. Resin has a limited working time, so you do not want to search for materials mid-pour. Finally, check the resin’s minimum room temperature and cure conditions.
Tip 1: Start with a Clean Beach-to-water Composition
Decide where the sand, shallow water, deep water, and main wave line will sit before you pour anything. If needed, make a pencil mark or light guide on the back or edge of the panel so you can follow the plan without marking the visible surface.
For a natural ocean look, keep the shoreline slightly curved or diagonal. Avoid splitting the panel perfectly in half unless you intentionally want a symmetrical design. A centered, straight wave can make the piece feel stiff.
Jenna-style ocean pieces often work because the wave path is simple and readable before resin is added. If the composition looks good as a basic layout, the resin effects have a stronger foundation.
Tip 2: Mix Transparent Blues for Depth Instead of One Flat Color
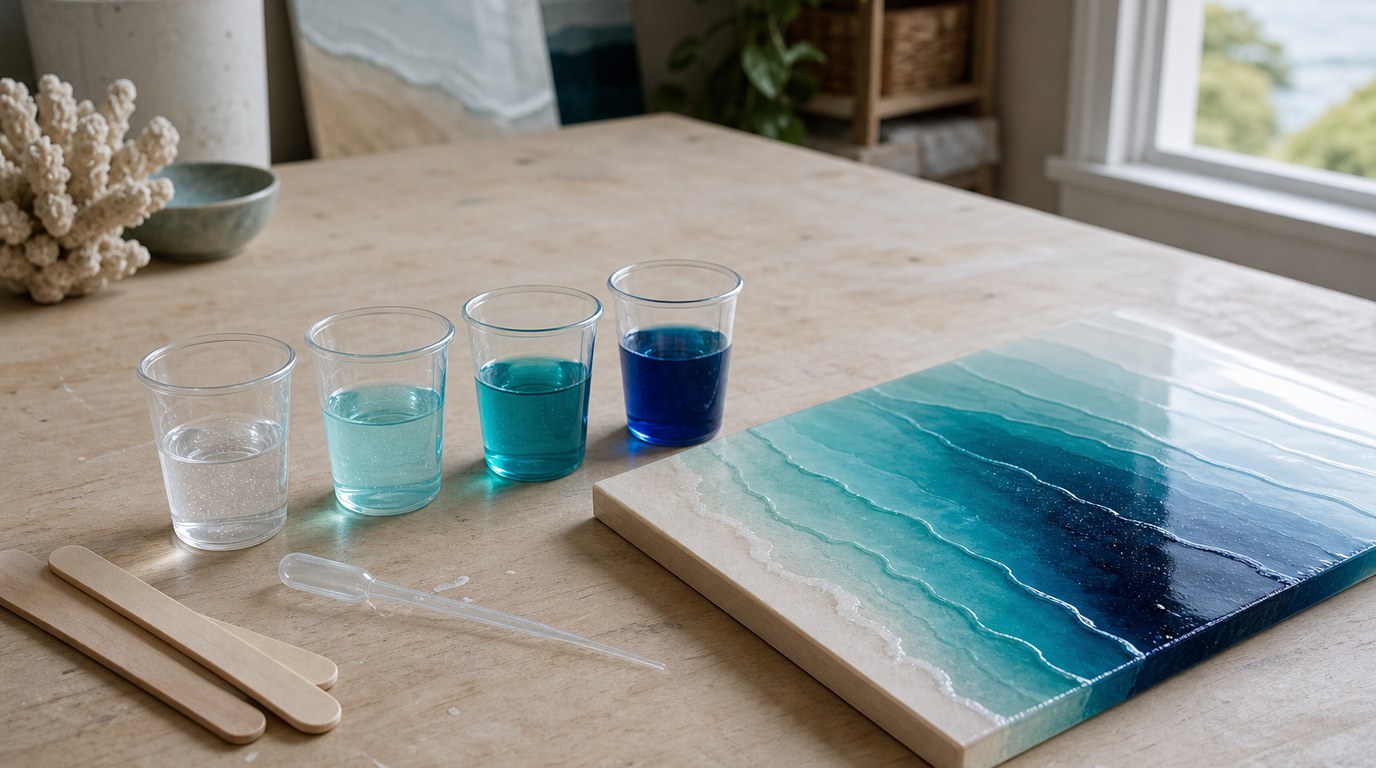
For realistic water, mix separate cups of resin: clear, light aqua, teal, and deeper blue. Use transparent pigments or alcohol inks carefully so light can pass through the water layers. This transparency is what makes the ocean area feel dimensional instead of painted on.
Pour darker blue toward the outer or deeper water area. Place lighter aqua closer to the shore, where the water would naturally look thinner and brighter. Add clear resin between colors if you want a softer transition.
Blend edges gently with a gloved finger, stir stick, or heat tool. The goal is a gradual shift, not a fully mixed blue-green puddle. Less pigment is often better because over-pigmented resin can lose depth, look cloudy, or cure poorly if you exceed the resin’s pigment limit.
Tip 3: Use Opaque White Resin Sparingly for Foam and Lacing
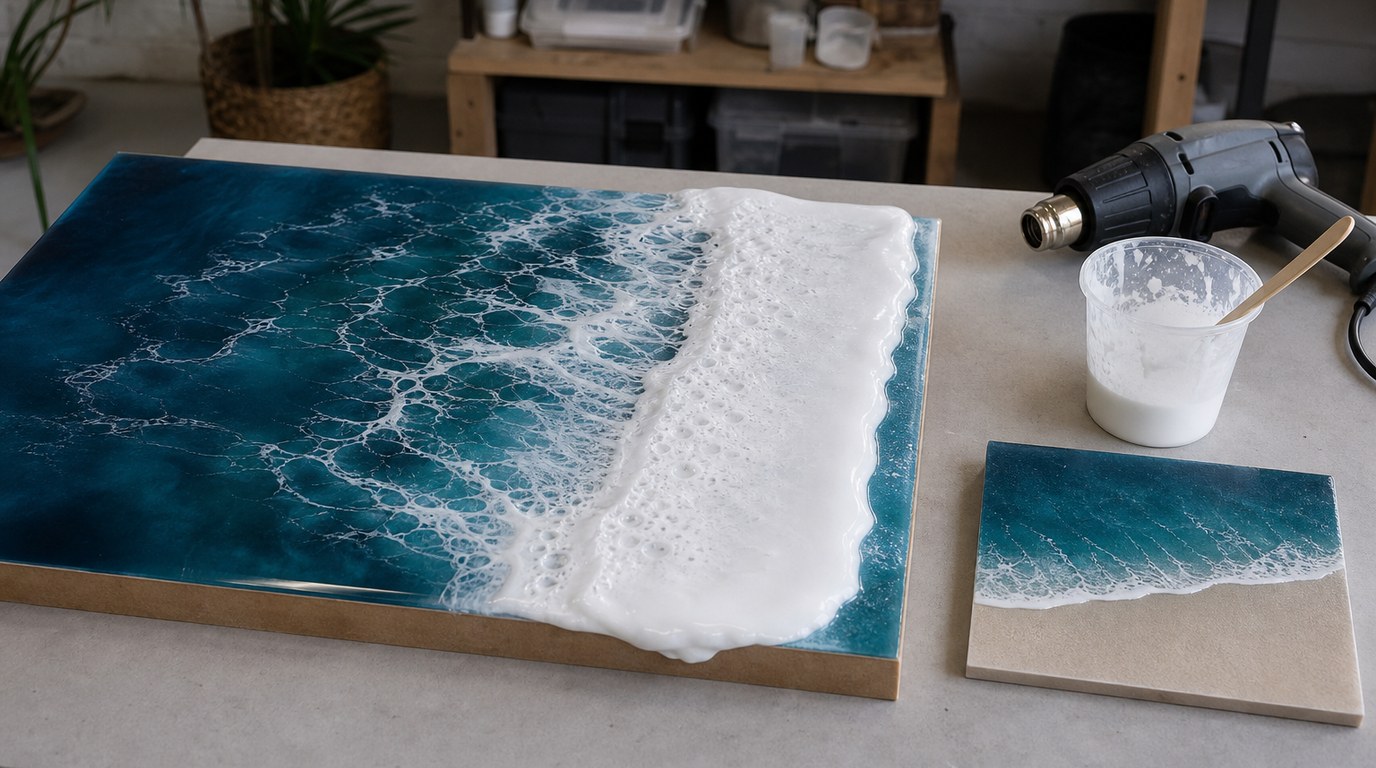
Mix a small cup of resin with opaque white pigment paste. This white resin creates the foam, cells, and lacing that make the wave look active. It should be opaque enough to show over the blue layer, but you do not need much.
Place the white resin along the planned wave line rather than across the entire ocean area. Start with a thin line. You can always add a little more, but excess white is hard to remove once it spreads.
The goal is broken, natural foam patterns, not a solid painted stripe. Think of the white as the crest and froth of the wave. It should move over the blue layer in wisps, cells, and uneven edges. If you pour a heavy band of white, the wave may turn into a blob instead of delicate lacing.
Tip 4: Move the Wave with Heat, but Keep the Tool in Control
Use a heat gun to push the white resin from the shore into the water, or from the foam line outward, depending on the wave direction you want. Aim the airflow so the white stretches across the blue rather than sinking straight into it.
Start with low or medium heat and increase only if the resin is not moving. Use short bursts instead of continuous blasting. Keep the tool moving to avoid overheating, ripples, scorched resin, or blown-out color. If you stay too long in one spot, the wave can separate, blur, or lose its lacing.
Pop bubbles separately and do not confuse bubble removal with wave shaping. A quick pass of heat can release bubbles, but shaping a wave requires directional airflow. Work slowly, watch how the resin responds, and stop before the pattern becomes overworked.
Tip 5: Build Waves in Layers and Let Each Pour Cure Properly
One pour can make a pretty wave, but multiple thin layers create better depth. Let the first layer cure to the resin brand’s recommended recoat stage. If it fully cures and your resin instructions require sanding before recoating, lightly sand and clean the surface before adding the next layer.
For the second wave, place the white line slightly offset from the first. This creates the feeling of moving water instead of one frozen stripe. You can also add a clear resin layer between wave layers to increase depth and make the foam appear suspended.
Keep later layers simpler. Too many wave lines, colors, and foam marks can crowd the design. A few well-placed layers usually look more realistic than a busy surface.
Common Mistakes and How to Fix Them
Problem: the white foam turned into a solid blob.
Fix it next time by using less white resin, waiting until the resin is slightly thicker, and pushing with shorter heat bursts.
Problem: the colors look muddy.
Mix fewer blue tones, avoid overworking the transitions, and let the pours settle naturally instead of stirring everything together.
Problem: resin ran off the edge.
Check that the surface is level, tape edges if needed, and pour less resin at once.
Problem: bubbles appeared near the shore.
Seal porous sand effects, wood, or canvas before pouring. Use controlled heat for bubble popping, not aggressive blasting.
Problem: wave lacing disappeared.
Avoid overheating the white resin. Also use an opaque white pigment paste suited for resin, since some colorants do not create strong lacing.
Problem: the surface cured tacky.
Confirm the resin ratio, mix completely, work within the right temperature range, and stay within pigment limits.
Result Check: How to Know Your Resin Ocean Waves Worked
Your resin ocean waves worked if the shoreline has a clear direction and does not look like a straight white stripe. The water colors should shift from light to dark with some transparency. The white foam should have broken lacing, wispy edges, and natural variation.
The finished surface should cure hard, glossy, and level according to the resin instructions. There should be no major sticky areas, scorch marks, or excessive bubbles.
Finishing Touches for a Polished Ocean Resin Piece
Remove tape after the resin reaches the right stage recommended by the manufacturer. If resin dripped onto the back, sand or clean the drips as needed.
Add a clear flood coat if the surface needs extra gloss or depth. Attach hanging hardware only after the piece has cured enough to handle safely. When photographing the finished art, shoot from a slight angle so the lacing, shine, and layered depth are easy to see.
FAQ
What Kind of Resin Is Best for Ocean Wave Art?
Use a clear art resin or coating resin designed for thin pours and glossy surfaces. It should be compatible with pigments and suitable for the project size. Check the brand’s maximum pour depth, working time, cure time, and temperature requirements before starting.
How Do You Get Cells and Lacing in Resin Waves?
Cells and lacing come from moving opaque white resin over a wet blue resin layer with controlled heat. Use resin-safe white pigment paste, apply a thin line, and push it gently with a heat gun. Too much heat or too much white can flatten the pattern.
Can Beginners Make Resin Ocean Waves?
Yes. Beginners should start on small panels, coasters, or trays with a simple shoreline, two or three transparent blues, and a small amount of white. Practice heat control on a test piece before attempting a larger artwork.
Why Did My Resin Ocean Wave Spread Too Much?
The resin may have been too thin, the surface may not have been level, or you may have used too much heat. The wave can also spread if you pour too much white resin. Use less material, shorter heat bursts, and check the level before pouring.
How Long Should Resin Ocean Art Cure Before Adding Another Wave Layer?
Follow your resin brand’s recoat window. Some resins allow another layer when the first is firm but still within the recoat stage. If the layer fully cures, you may need to sand and clean it before recoating so the next layer bonds properly.